|

This
Tutorial is copyrighted to the Tutorial Writer, © Emmy Kruyswijk.
This Tutorial may not be forwarded, shared or otherwise placed on any Web Site
or group without written
permission from
Emmy Kruyswijk.
Please respect my work and don't change the file names.
Do you want to link my lessons?
Please send
me a mail.
Needing:
The beautiful poser tube is from Gerda.
The tube should I not share. Her tubes you can
find
here.
I have used parts of the
scrapkit from Big City New Year's Eve of
AngelazCreationz.
1 preset (Emmyposerny).
Before you begins.......
Open the tubes in PSP.
Double click the preset Alien Skin (Emmyposerny),
he imports itself in the plug-in.
Material

Big City New Year's Eve

1.
File - open new transparent image 700x700.
Convert to raster layer.
Set the foreground color to #.
Selections - select all.
2.
Activate the tube element32 -
edit - copy.
Edit - paste as a new layer on the image.
Selections - select none.
Layers - duplicate.
Activate the original tube layer.
3.
Adjust - blur - Gaussian blur - radius 65.
Activate the top layer.
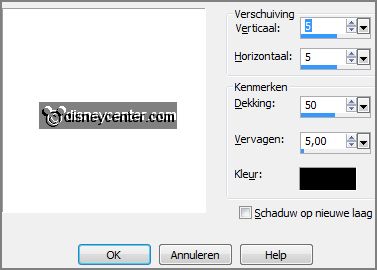
Effects - 3D Effects - drop shadow - with this setting.

Image - resize 90% - all layers not checked.
4.
Activate the tube element20 -
edit - copy.
Edit - paste as a new layer on the image.
Effects - 3D Effects - drop shadow - setting is right.
5.
Activate the tube snowman-2013-06a
edit - copy.
Edit - paste as a new layer on the image.
Activate move tool - set it at the right site - see example.
Effects - plug-ins - Alien Skin Eye Candy 5 Impact - Gradient Glow - click
Settings - click User Setting - click at Emmyposerny - click OK.
Effects - 3D Effects - drop shadow - setting is right.
6.
Activate the tube element21 -
edit - copy.
Edit - paste as a new layer on the image.
Image - resize 75% - all layers not checked.
Place it left between the 2 houses - see example.
Effects - 3D Effects - drop shadow - setting is right.
7.
Activate the tube element19 -
edit - copy.
Edit - paste as a new layer on the image.
Place it right at the top -see example.
Effects - 3D Effects - drop shadow - setting is right.
Layers - arrange - down - set this under raster 2.
Activate the top layer.
8.
Activate the tube element11 -
edit - copy.
Edit - paste as a new layer on the image.
Place it at the bottom - see example.
Effects - 3D Effects - drop shadow - setting is right.
9.
Activate the tube element6 -
edit - copy.
Edit - paste as a new layer on the image.
Place it left near the bottle.
Effects - 3D Effects - drop shadow - setting is right.
10.
Activate the tube element7 -
edit - copy.
Edit - paste as a new layer on the image.
Place it left near the other glass.
Effects - 3D Effects - drop shadow - setting is right.
11.
Layers - new raster layer - set your watermark into the image.
Layers - merge - merge all visible layers.
File - export - PNG Optimizer.
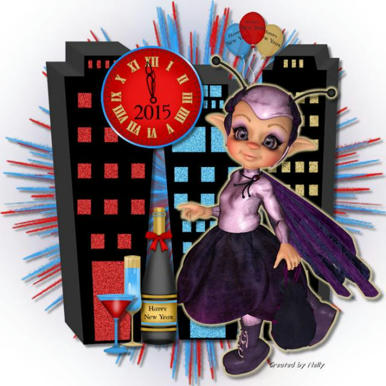
Ready is the tag
I hope you like this tutorial.
greetings Emmy
Thank you Nelly for testing.


tutorial
written
15-11-2014 |