This
Tutorial is copyrighted to the Tutorial Writer, © Emmy Kruyswijk.
This Tutorial may not be forwarded, shared or otherwise placed on any Web Site
or group without written
permission from Emmy Kruyswijk.
Please respect my work and from others, don't change the file names.
Do you want to link my lessons?
Please send me a mail.
Needing:
I use parts of different scrapkits.
The poser tube is a buy tube of me. Is not by the material. You can buy it
here.
Before you begins.......
Open the tubes in PSP.
Material

The Circus is Coming

1.
File - open new transparent image 700x700.
Activate the tube achtergrond -
edit - copy.
Edit - paste as a new layer on the image.
2.
Activate the tube emeto_summer playground _playground base -
edit - copy.
Edit - paste as a new layer on the image.
Activate move tool - place it at the bottom.
3.
Activate the tube element5 -
edit - copy.
Edit - paste as a new layer on the image.
Place it at the left side - a little to the middle - see example.
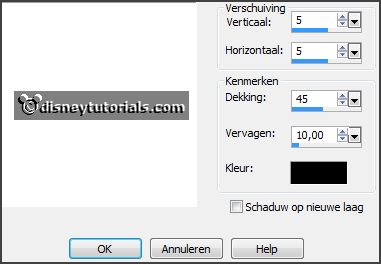
Effects - 3D Effects - drop shadow - with this setting.

4.
Activate the tube Flergs_CircusMagic_Frame3 -
edit - copy.
Edit - paste as a new layer on the image.
Place it right at the tree.
Effects - 3D Effects - drop shadow - setting is right.
5.
Activate the tube framebgr -
edit - copy.
Edit - paste as a new layer on the image.
Place it on the frame.
Layers - arrange - down.
6.
Activate the tube dak-
edit - copy.
Edit - paste as a new layer on the image.
Place it above the frame - see example.
Effects - 3D Effects - drop shadow - setting is right.
7.
Activate the tube bord-
edit - copy.
Edit - paste as a new layer on the image.
Place it at the top in the frame.
8.
Activate the tube olifantbal-
edit - copy.
Edit - paste as a new layer on the image.
Place it left under in the frame.
9.
Activate the tube dolfijn-
edit - copy.
Edit - paste as a new layer on the image.
Place it right at the bottom.
Effects - 3D Effects - drop shadow - setting is right.
10.
Activate the tube clownschoen-
edit - copy.
Edit - paste as a new layer on the image.
Place it right at the bottom.
Effects - 3D Effects - drop shadow - setting is right.
11.
Activate the tube hoed-
edit - copy.
Edit - paste as a new layer on the image.
Place it in the middle at the bottom.
Effects - 3D Effects - drop shadow - setting is right.
12.
Activate the tube gras-
edit - copy.
Edit - paste as a new layer on the image.
Place it at the bottom of the boom.
Effects - 3D Effects - drop shadow - setting is right.
13.
Activate the poser tube -
edit - copy.
Edit - paste as a new layer on the image.
Place it at the left side.
Effects - 3D Effects - drop shadow - setting is right.
14.
Layers - new raster layer - set your watermark into the image.
Layers - merge - merge all visible layers.
File - export - PNG Optimizer.
Ready is the tag
I hope you like this tutorial.
greetings Emmy
Thank you Nelly for testing.