This
Tutorial is copyrighted to the Tutorial Writer, © Emmy Kruyswijk.
This Tutorial may not be forwarded, shared or otherwise placed on any Web Site
or group without written
permission from Emmy Kruyswijk.
Please respect my work and from others, don't change the file names.
Do you want to link my lessons?
Please send me a mail.
Needing:
I use parts of different scrapkits.
The poser tube is a buy tube of me. Is not by the material. You can buy it
here.
Before you begins.......
Open the tubes in PSP.
Material

Just Beachy

1.
. Open new transparent image 700x700.
Open the tube achtergrond - copy - paste on the image.
2.
Open the tube zon - copy - paste on the image.
Place it right at the top.
3.
Open the tube zand - copy - paste on the image.
Place it to the bottom.
4.
Open the tube wolken - copy - paste on the image.
Place it at the top.
5.
Open the tube palmboom - copy - paste on the image.
Place it to the left and to the top.
6.
Open the tube MDesigns-element3 - copy - paste on the image.
Place it by the palm tree - see example.
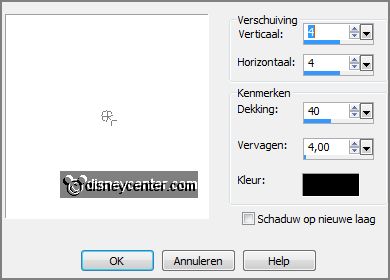
Give a drop shadow with this setting.

7.
Open the tube schelpen - copy - paste on the image.
Place it left below.
Give the same drop shadow.
8.
Open the tube agnesingap_sea_wave_el(8) - copy - paste on the image.
Place it on the sign.
Give the same drop shadow.
9.
Open the tube SummerParadise_Addon_wendyp_elements (6) - copy - paste on the
image.
Place it right - see example.
Give the same drop shadow.
10.
Open the tube el33 - copy - paste on the image.
Place it right - for the parasol - see example.
Give the same drop shadow.
11.
Open the tube el27 - copy - paste on the image.
Place it right - by the paaltjes (el33) - see example.
Give the same drop shadow.
12.
Open the poser tube - copy - paste on the image.
Place it in the middle.
Give the same drop shadow.
13.
Open the tube just beachy - copy - paste on the image.
Place it right at the bottom.
Give the same drop shadow.
14.
Open the tube emmer - copy - paste on the image.
Place it left at the bottom.
Give the same drop shadow.
15.
Open the tube VC_Let'sGoFishing_El20 - copy - paste on the image.
Place it left at the bottom - for the bucket.
Give the same drop shadow.
16.
Layers - new raster layer - set your watermark into the image.
Layers - merge - merge all visible layers.
File - export - PNG Optimizer.
Ready is the tag
I hope you like this tutorial.
greetings Emmy
Thank you Ingrid for testing.