This
Tutorial is copyrighted to the Tutorial Writer, © Emmy Kruyswijk.
This Tutorial may not be forwarded, shared or otherwise placed on any Web Site
or group without written
permission from Emmy Kruyswijk.
Please respect my work and from others, don't change the file names.
Do you want to link my lessons?
Please send me a mail.
Needing:
I use parts of different scrapkits.
The poser tube is a buy tube of me. Is not by the material. You can buy it
here.
Before you begins.......
Open the tubes in PSP.
Material

Perfect Moment

1.
Open new transparent image 700x700.
Open mask - copy - paste on the image.
2.
Open SE_Doodle_duo - copy - paste on the image.
Place it right at the top.
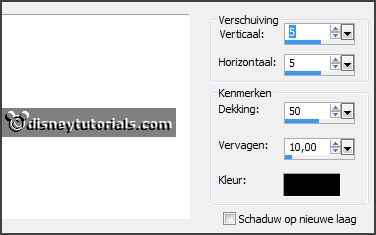
Give a drop shadow with this setting.

3.
Open Frame-SF - copy - paste on the image.
Place it right at the top - see example.
Give the same drop shadow.
4.
Open bgr.frame - copy - paste on the image.
Place it on the frame.
Layers - arrange - move down.
5.
Open poser tube - copy - paste on the image.
Place it as in the example.
Erase all, what comes under the frame - not the hand.
Layers - duplicate.
Layers - arrange - move up.
Give the same drop shadow.
Erase all, what stays on the frame - not the arm.
6.
Open kleinframe - copy - paste on the image.
Place it left at the top.
Give the same drop shadow.
7.
Open bgr.kleinframe - copy - paste on the image.
Place it on the little frame.
Layers - arrange - move down.
8.
Select the head of your poser tube - copy - paste on the image.
Place it in the little frame - maybe you must resize it.
Set the opacity of this layer on 50.
Activate the top layer.
9.
Open mdesigns_element6 - copy - paste on the image.
Place it left at the bottom.
Give the same drop shadow.
10.
Open mdesigns_element54 - copy - paste on the image.
Place it left at the bottom.
Give the same drop shadow.
Layers - duplicate - image - mirror.
11.
Open mdesigns_element1 - copy - paste on the image.
Place it left at the bottom on the grass - near the lantarn.
Give the same drop shadow.
12.
Open mdesigns_element55 - copy - paste on the image.
Place it in the middle at the bottom.
Give the same drop shadow.
13.
Open perfectmoment - copy - paste on the image.
Place it in the middle at the bottom - see example.
Give the same drop shadow.
14.
Open mdesigns_element9 - copy - paste on the image.
Place it left at the bottom.
Give the same drop shadow.
15.
Open mdesigns_element7 - copy - paste on the image.
Place it left at the bottom.
Give the same drop shadow.
16.
Open mdesigns_element4 - copy - paste on the image.
Place it in the middle at the bottom.
Give the same drop shadow.
17.
Open mdesigns_element45 - copy - paste on the image.
Place it in the middle at the bottom.
Give the same drop shadow.
18.
Layers - new raster layer - set your watermark into the image.
Layers - merge - merge all visible layers.
File - export - PNG Optimizer.
Ready is the tag
I hope you like this tutorial.
greetings Emmy
Thank you Ingrid for testing.