|

This
Tutorial is copyrighted to the Tutorial Writer, © Emmy Kruyswijk.
This Tutorial may not be forwarded, shared or otherwise placed on any Web Site
or group without written
permission from
Emmy Kruyswijk.
Please respect my work and don't change the file names.
Do you want to link my lessons?
Please send
me a mail.
Needing:
The maker of this
beautiful poser tube is unknown.
I have used parts of the scrapkits from Spring Eggs of
Sekada Design.
And tubes from internet.
Before you begins.......
Open the tubes in PSP.
Material

Spring is Coming

1.
File - open new transparent image 700x700.
Activate the tube grond -
edit - copy.
Edit - paste as a new layer on the image.
Activate move tool - set it at the bottom.
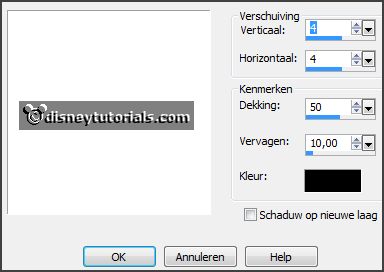
Effects - 3D Effects - drop shadow - with this setting.

2.
Activate the tube 055 -
edit - copy.
Edit - paste as a new layer on the image.
Place it at the left side - see example.
Effects - 3D Effects - drop shadow - setting is right.
Layers - duplicate.
Image - mirror.
Layers - merge - merge down.
Layers - arrange - down.
3.
Activate the top layer.
Activate the tube 011 -
edit - copy.
Edit - paste as a new layer on the image.
Place it a little down - see example.
Effects - 3D Effects - drop shadow - setting is right.
4.
Activate the tube knuffelgnome24 -
edit - copy.
Edit - paste as a new layer on the image.
Place it at the border of the frame.
Effects - 3D Effects - drop shadow - setting is right.
5.
Activate the tube 012 -
edit - copy.
Edit - paste as a new layer on the image.
Image - mirror.
Place it at the right side - see example.
Effects - 3D Effects - drop shadow - setting is right.
6.
Activate the tube plant -
edit - copy.
Edit - paste as a new layer on the image.
Place it for the poser tube - see example.
Effects - 3D Effects - drop shadow - setting is right.
7.
Activate the tube madeliefjes -
edit - copy.
Edit - paste as a new layer on the image.
Place it right at the top of the ground - see example.
Effects - 3D Effects - drop shadow - setting is right.
8.
Activate the tube SussieM Here Comes the Spring CE5 -
edit - copy.
Edit - paste as a new layer on the image.
Place it at the right side at the bottom - see example.
Effects - 3D Effects - drop shadow - setting is right.
9.
Activate the tube Nest -
edit - copy.
Edit - paste as a new layer on the image.
Place it near the flowers right - see example.
Effects - 3D Effects - drop shadow - setting is right.
10.
Activate the tube 032 -
edit - copy.
Edit - paste as a new layer on the image.
Place it left near the nest- see example.
Effects - 3D Effects - drop shadow - setting is right.
11.
Activate the tube 029 -
edit - copy.
Edit - paste as a new layer on the image.
Place it right near the nest - see example.
Effects - 3D Effects - drop shadow - setting is right.
12.
Activate the tube 069 -
edit - copy.
Edit - paste as a new layer on the image.
Place it in the middle at the top- see example.
Effects - 3D Effects - drop shadow - setting is right.
13.
Layers - new raster layer - set your watermark into the image.
Layers - merge - merge all visible layers.
File - export - PNG Optimizer.
Ready is the tag
I hope you like this tutorial.
greetings Emmy
Thank you Nelly for testing.


tutorial
written
16-11-2014 |