This
Tutorial is copyrighted to the Tutorial Writer, © Emmy Kruyswijk.
This Tutorial may not be forwarded, shared or otherwise placed on any Web Site
or group without written
permission from Emmy Kruyswijk.
Please respect my work and from others, don't change the file names.
Do you want to link my lessons?
Please send me a mail.
Needing:
I use parts of different scrapkits.
The poser tube is a buy tube of me. Is not by the material. You can buy it
here.
Before you begins.......
Open the tubes in PSP.
Double click the preset Alien Skin (Emmysnow), he imports
itself in the plug-in.
Material

Wonder of Christmas

1.
Open new transparent image 700x700.
Open masker - copy - paste on the image.
2.
Open snowstars - copy - paste on the image.
Place it left at the top.
3.
Open Venster - copy - paste on the image.
Place it a little up.
Effects – plug-ins – Alien Skin Eye Candy 5 Impact – Gradient Glow.
Click on Settings – User Settings – click on Emmysnow – click OK.
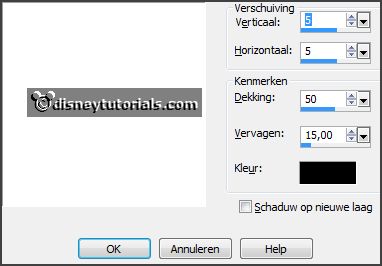
Give a drop shadow - with this setting.

4.
Open bgrvenster - copy - paste on the image.
Place it on the frame.
Layers - arrange - down.
5.
Open je poser tube - copy - paste on the image.
Place it in the window - see example.
Erase the part, what's comes under the window.
Layers - duplicate.
Give the same drop shadow.
Layers - arrange - up.
Erase the part what's stays on the window.
6.
Open Christmas Gift (32) - copy - paste on the image.
Place it at the right side.
Give the same drop shadow.
7.
Open belletjes - copy - paste on the image.
Place it on the lantarn - see example.
Give the same drop shadow.
8.
Open Christmas Gift (7) - copy - paste on the image.
Place it right at the bottom.
Give the same drop shadow.
9.
Open tekst - copy - paste on the image.
Place it in the middle at the bottom.
Give the same drop shadow.
10.
Open ijstak1 - copy - paste on the image.
Place it at the left side.
11.
Open clusterEmmy - copy - paste on the image.
Place it left at the bottom.
Give the same drop shadow.
12.
Layers - new raster layer - set your watermark into the image.
Layers - merge - merge all visible layers.
File - export - PNG Optimizer.
Ready is the tag
I hope you like this tutorial.
greetings Emmy
Thank you Ingrid for testing.