|

This
Tutorial is copyrighted to the Tutorial Writer, © Emmy Kruyswijk.
This Tutorial may not be forwarded, shared or otherwise placed on any Web Site
or group without written
permission from
Emmy Kruyswijk.
Please respect my work and don't change the file names.
Do you want to link my lessons?
Please send
me a mail.
Needing:
The beautiful poser tube is Gerda and should not be
shared. Her site can be found
here
If you want to use this tube,
you need to download the tube from her site.
I
used parts from the scrapkits from Haunted Dreams
of
Raspberry Road
Design.
And a few other tubes.
Before you begins.......
Open the tubes in PSP.
Material

Beware

1.
File - open new transparent image 700x700.
Activate the tube boom -
edit - copy.
Edit - paste as a new layer on the image.
Activate move tool - set it right at the top - see example.
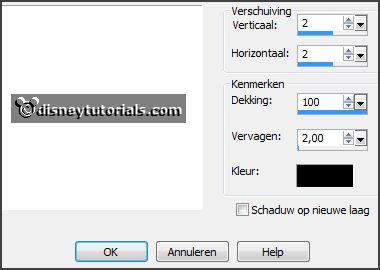
Effects - 3D Effects - drop shadow - with this setting.
2.
Activate the tube Kristin-Nightmare 2-Frame 2 -
edit - copy.
Edit - paste as a new layer on the image.
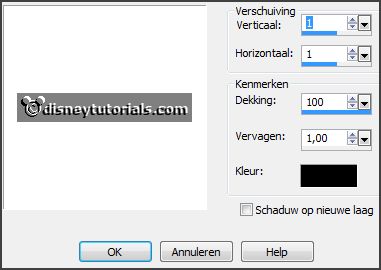
Effects - 3D Effects - drop shadow - with this setting.
Activate the magic wand - select in the middle of the frame.
Selections - modify - expand 6 pixels.
3.
Layers - new raster layer.
Fill the layer with this color #482128.
Selections - select none.
Layers - arrange - down.
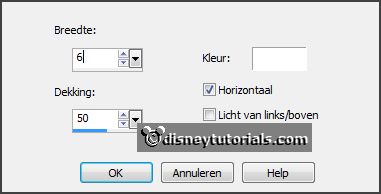
Effects - Texture effects - Blinds - with this setting.
4.
Activate the posertube -
edit - copy.
Edit - paste as a new layer on the image.
Activate selection tool - rectangle - and make a selection - as below.
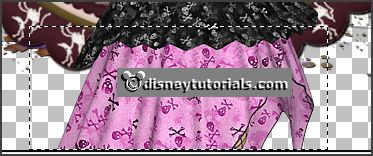
Click at the delete key.
Selections - select none.
Layers - duplicate.
Layers - arrange - up.
Activate the eraser - and erase the rest on the frame.
Effects - 3D Effects - drop shadow - setting is right.
5.
Activate the tube RR_HauntedDreams_Element015 -
edit - copy.
Edit - paste as a new layer on the image.
Place ir right at the bottom - see example.
Effects - 3D Effects - drop shadow - setting is right.
6.
Activate the tube RR_HauntedDreams_Element017 -
edit - copy.
Edit - paste as a new layer on the image.
Place it in the middle at the bottom.
Layers - arrange - down.
Effects - 3D Effects - drop shadow - setting is right.
7.
Activate the top layer.
Activate the tube RR_HauntedDreams_Element018 -
edit - copy.
Edit - paste as a new layer on the image.
Image - resize 75% - all layers not checked.
Place it left at the bottom - see example.
Effects - 3D Effects - drop shadow - setting is right.
8.
Activate the tube Blackcat -
edit - copy.
Edit - paste as a new layer on the image.
Place it between the pumpkin and beware - see example.
Effects - 3D Effects - drop shadow - setting is right.
9.
Activate the tube AngeliquesScraps_CollabSpookyNights_element(27) -
edit - copy.
Edit - paste as a new layer on the image.
Image - mirror.
Place ti left at the pumpkin.
Effects - 3D Effects - drop shadow - setting is right.
10.
Activate the tube Hell-s-Kindergarten_SussieM_el(48) -
edit - copy.
Edit - paste as a new layer on the image.
Place it left at the top.
Effects - 3D Effects - drop shadow - setting is right.
Layers - arrange - down - set this under raster 7.
11.
Layers - new raster layer - set your watermark into the image.
Layers - merge - merge all visible layers.
File - export - PNG Optimizer.
Ready is the tag
I hope you like this tutorial.
greetings Emmy
Thank you Nelly for testing.


tutorial
written
18-11-2014 |