This
Tutorial is copyrighted to the Tutorial Writer, © Emmy Kruyswijk.
This Tutorial may not be forwarded, shared or otherwise placed on any Web Site
or group without written
permission from Emmy Kruyswijk.
Please respect my work and from others, don't change the file names.
Do you want to link my lessons?
Please send me a mail.
Needing:
I use parts of different scrapkits.
Before you begins.......
Open the tubes in PSP.
Material

Our Wedding

1.
Open new transparent image 725x725.
Open emmymask - copy - paste on the image.
2.
Open zand - copy - paste on the image.
Place it right at the bottom.
3.
Open tree - copy - paste on the image.
Place it left/middle at the top - see example.
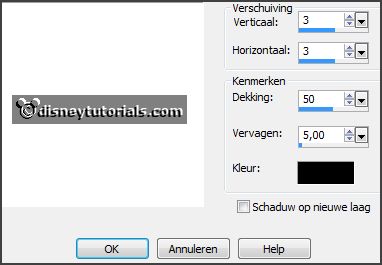
Give a drop shadow - with this setting.

4.
Open gras - copy - paste on the image.
Place it right at the bottom the tree - see example.
Give the same drop shadow.
5.
Open ms-mk11-element66 - copy - paste on the image.
Place it left against the tree - see example.
Give the same drop shadow.
6.
Open merryli36 - copy - paste on the image.
Image - mirror.
Place it right on the bridge - see example.
Set the opacity of this layer to 42.
Activate the eraser tool and erase parts of the bridge - see example.
7.
If all is okay - set the opacity back to 100.
Give the same drop shadow.
Make raster 4 active (grass).
Layers - duplicated.
Place it left at the bottom - see example.
Layers - arrange - bring to top.
8.
Open chip1 - copy - paste on the image.
Place it in the middle at the bottom.
Give the same drop shadow.
9.
Open lantaarn - copy - paste on the image.
Place it at the left side- see example.
Give the same drop shadow.
10.
Open JRs13_SpringRain_63 - copy - paste on the image.
Place it before the lantaarn.
Give the same drop shadow.
11.
Open 30 - copy - paste on the image.
Place it left at the bottom.
Give the same drop shadow.
12.
Open enveloppe - copy - paste on the image.
Place it left at the bottom.
Give the same drop shadow.
13.
Open ms-wk2-element23- copy - paste on the image.
Place it left at the bridge.
Give the same drop shadow.
14.
Open ms-wk2-tekst1- copy - paste on the image.
Place it right at the top.
15.
Open 6- copy - paste on the image.
Place it left at the bottom.
16.
Layers - new raster layer - set your watermark into the image.
Layers - merge - merge all visible layers.
File - export - PNG Optimizer.
Ready is the tag
I hope you like this tutorial.
greetings Emmy
Thank you Ingrid for testing.