|

This
Tutorial is copyrighted to the Tutorial Writer, © Emmy Kruyswijk.
This Tutorial may not be forwarded, shared or otherwise placed on any Web Site
or group without written
permission from
Emmy Kruyswijk.
Please respect my work and from others, don't change the file
names.
Do you want to link my lessons?
Please send
me
a mail.
Needing:
The poser tube is from me. My site you can find
here.
If you
use my tubes put than the copyright render at the image.
I use parts of different scrapkits.
Before you begins.......
Open the tubes in PSP.
Material

Summer

1.
Open new transparent image 700x700.
Open achtergrond - copy - paste on the image.
2.
Open zee - copy - paste on the image.
Open MC_DownbyTheSea_E16 - copy - paste on the image.
Place it totally at the bottom.
3.
Open image12 (3) - copy - paste on the image.
Place it in the middle - see example.
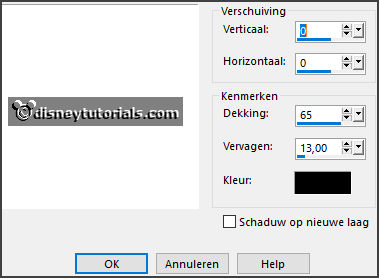
Give a drop shadow - with this setting.

4.
Open element1 - copy - paste on the image.
Place it left at the bottom.
Give the same drop shadow.
5.
Open element (40) - copy - paste on the image.
Give the same drop shadow.
6.
Open SummerParadise_Addon_wendyp_elements (6) - copy - paste on the image.
Place it right at the top - see example.
Give the same drop shadow.
7.
Open RR_LakesideRetreat_Element(29) - copy - paste on the image.
Place it at the bottom of the parasol.
Give the same drop shadow.
8.
Open CaliDesign_Shelling_Elements(28) - copy - paste on the image.
Place it right of the parasol.
Give the same drop shadow.
9.
Open CaliDesign_Shelling_Elements(13) - copy - paste on the image.
Place it for the pot - see example.
Give the same drop shadow.
10.
Open CaliDesign_Shelling_Elements(2) - copy - paste on the image.
Place it left of the shell - see example.
Give the same drop shadow.
11.
Open de poser tube - copy - paste on the image.
Place it left at the bottom.
Give the same drop shadow.
12.
Open CaliDesign_Shelling_Elements(4) - copy - paste on the image.
Place it left at the bottom.
Give the same drop shadow.
13.
Open SuzanneDesignsSummerT_el62 - copy - paste on the image.
Place it left at the top.
Give the same drop shadow.
14.
Layers - new raster layer - set your watermark into the image.
Layers - merge - merge all visible layers.
File - export - PNG Optimizer.
Ready is the tag
I hope you like this tutorial.
greetings Emmy
Thank you Ingrid for testing.


tutorial written 19-02-2018 |