
This
Tutorial is copyrighted to the Tutorial Writer, © Emmy Kruyswijk.
This Tutorial may not be forwarded, shared or otherwise placed on any Web Site
or group without written
permission from Emmy Kruyswijk.
Please respect my work and from others, don't change the file names.
Do you want to link my lessons?
Please send me a mail.
Needing:
I use parts of different scrapkits.
The poser tube is a buy tube of me. Is not by the material. You can buy it
here.
Before you begins.......
Open the tubes in PSP
Set the gradient in the folder gradient.
Material

Little Italy

1.
Open new transparent image 900x700.
Invert to raster layer.
Selections - select all.
2.
Open paper - copy - paste into selection.
Selections - select none.
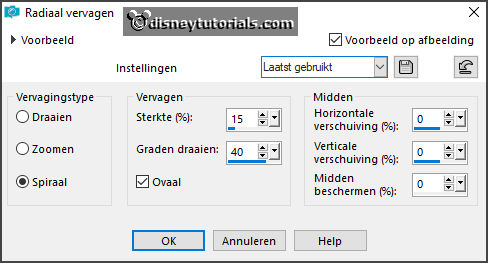
Adjust - blur - radial blur - with this setting.
Adjust - blur - Gaussian blur - with this setting.
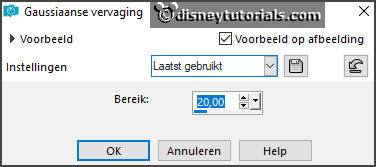
Repeat Gaussian blur - setting is right.
3.
Open frame - copy - paste on the image.
Place it left at the top.
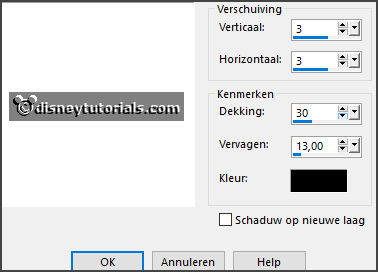
Give a drop shadow - with this setting.
Selection tool - rectangle - and make a selection - as below.
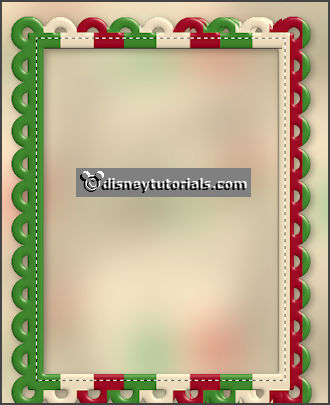
Layers - new raster layer - fill this with the color white.
Layers - arrange - down.
Selections - select none.
4.
Open gondelaar - copy - paste on the image.
Move this in the frame.
Activate the top layer.
5.
Open lijnen - copy - paste on the image.
Place this - as in the example.
Layers - arrange - down - under raster 3.
Give the same drop shadow.
Activate the top layer.
6.
Open pizzabakker - copy - paste on the image.
Place it right at the bottom of the frame - see example.
Give the same drop shadow.
7.
Open vlag - copy - paste on the image.
Place it left at the bottom.
Give the same drop shadow.
8.
Open de poser tube - copy - paste on the image.
Place it right at the bottom.
Give the same drop shadow.
9.
I do the pizza with plate by the materials. You can use it for another poser.
Layers - new raster layer - set your watermark into the image.
10.
Image - add border - symmetric checked - 4 pixels #b90000.
Image - add border - symmetric checked - 4 pixels #ffffff.
Image - add border - symmetric checked -4 pixels #209512.
Image - add border - symmetric checked -20 pixels #ffffff.
Image - add border - symmetric checked - 4 pixels #b90000.
Image - add border - symmetric checked - 4 pixels #ffffff.
Image - add border - symmetric checked -4 pixels #209512.
11.
Click with the magic wand in the width border.
Set the foreground to gradient Emmy-Italia.
Fill the selection with the gradient.
Effects - 3D Effects - Inner Bevel - with this setting.
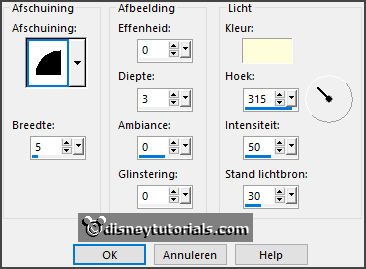
Image - resize 85% - all layers checked.
File - export - JPEG Optimizer.
Ready is the tag
I hope you like this tutorial.
greetings Emmy