This
Tutorial is copyrighted to the Tutorial Writer, © Emmy Kruyswijk.
This Tutorial may not be forwarded, shared or otherwise placed on any Web Site
or group without written
permission from Emmy Kruyswijk.
Please respect my work and from others, don't change the file names.
Do you want to link my lessons?
Please send me a mail.
Needing:
I use parts of different scrapkits.
The poser tube is a buy tube of me. Is not by the material. You can buy it
here.
Before you begins.......
Open the tubes in PSP
Material

Pakjes Avond....

1.
Open new transparent image 800x800.
Open Masker – copy - paste on the image.
2.
Open fireplace – copy - paste on the image.
Place it on the border of the wood in the middle.
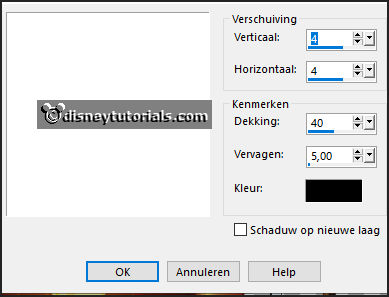
Effects – 3D effects – drop shadow – with this setting.

3.
Open vaas – copy - paste on the image.
Place it left on the fireplace.
Give the same drop shadow.
4.
Open klok– copy - paste on the image.
Place it right above thee fireplace.
Give the same drop shadow.
5.
Open plant– copy - paste on the image.
Place it right of the fireplace.
Give the same drop shadow.
6.
Open stoel– copy - paste on the image.
Place it left of the fireplace.
Give the same drop shadow.
7.
Open WA-Emmy– copy - paste on the image.
Place it in the middle at the top.
Give the same drop shadow.
8.
Open de poser tube– copy - paste on the image.
Place it on the chair.
Give the same drop shadow.
9.
Open jutte zak– copy - paste on the image.
Place it left at the bottom.
Give the same drop shadow.
10.
Open schoen– copy - paste on the image.
Place it right before the fireplace.
Give the same drop shadow.
11.
Open pakjes– copy - paste on the image.
Place it in the middle at the bottom.
Give the same drop shadow.
12.
Open HD-pakje– copy - paste on the image.
Place it right at the bottom.
Give the same drop shadow.
Layers – duplicate.
Image – resize format 75% - all layers not checked.
Image – mirror.
Place it for the other 2.
13.
Open HD-snoepgoed– copy - paste on the image.
Place it left of the big pakjes at the bottom.
Give the same drop shadow.
14.
Layers - new raster layer - set your watermark into the image.
Layers - merge - merge all visible layers.
File - export - PNG Optimizer.
Ready is the tag
I hope you like this tutorial.
greetings Emmy