This
Tutorial is copyrighted to the Tutorial Writer, © Emmy Kruyswijk.
This Tutorial may not be forwarded, shared or otherwise placed on any Web Site
or group without written
permission from Emmy Kruyswijk.
Please respect my work and from others, don't change the file names.
Do you want to link my lessons?
Please send me a mail.
Needing:
I use parts of different scrapkits.
The poser tube is a buy tube of me. Is not by the material. You can buy it
here.
Before you begins.......
Open the tubes in PSP
Material

Merry Christmas

1.
Open new transparent image 800x800.
Open Background – copy - paste on the image.
2.
Open Emmy-frame – copy - paste on the image.
Place it a little down.
Select with the magic wand in the middle of the frame.
Selections – modify – expand 5 pixels.
Layers – new raster layer – fill this with the color white.
Layers – arrange - down.
3.
Open House_Snow 14 - copy - paste on the image.
Selection - invert – click at the delete key.
Selections – select none.
Set the opacity of this layer to 77.
Activate the top layer.
4.
Open HS_Christmas6 - copy - paste on the image.
Place it at the left side at the top. The sign against the frame - see example.
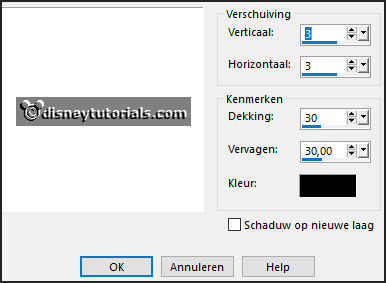
Effects – 3D effects – drop shadow – with this setting.

5.
Open pappels - copy - paste on the image.
Place it left under the sign – see example.
Give the same drop shadow.
Layers – duplicate – image – mirror.
Image – resize format 75 % - all layers not checked.
Place it near the other.
6.
Open santabag - copy - paste on the image.
Place it left at the bottom – see example.
Give the same drop shadow.
7.
Open je poser tube - copy - paste on the image.
Place it at the right side.
Give the same drop shadow.
8.
Open sterren1 - copy - paste on the image.
Place it in the middle at the bottom.
Give the same drop shadow.
9.
Open sterren2 - copy - paste on the image.
Place it in the middle at the bottom.
Give the same drop shadow.
10.
Open sterren3 - copy - paste on the image.
Place it in the middle at the right side.
Give the same drop shadow.
11.
Layers - new raster layer - set your watermark into the image.
Layers - merge - merge all visible layers.
File - export - PNG Optimizer.
Ready is the tag
I hope you like this tutorial.
greetings Emmy