This
Tutorial is copyrighted to the Tutorial Writer, © Emmy Kruyswijk.
This Tutorial may not be forwarded, shared or otherwise placed on any Web Site
or group without written
permission from Emmy Kruyswijk.
Please respect my work and from others, don't change the file names.
Do you want to link my lessons?
Please send me a mail.
Needing:
I use parts of different scrapkits.
The poser tube is a buy tube of me. Is not by the material. You can buy it
here.
Before you begins.......
Open the tubes in PSP
Material

Circus is Coming

1.
Open new transparent image 800x800.
Open masker – copy - paste on the image.
2.
Open part of circus– copy - paste on the image.
Move it a little to the right.
3.
Open stenen – copy - paste on the image.
Place it to the bottom.
4.
Open Flergs_CircusMagic_Frame2– copy - paste on the image.
Place it at the left side.
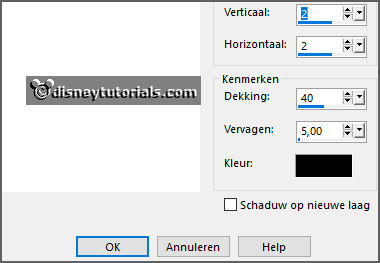
Effects – 3D effects – drop shadow – with this setting.

5.
Open achtergr.frame – copy - paste on the image.
Place it exactly on the frame.
Layers – arrange – down.
6.
Open bowler_clown – copy - paste on the image.
Place it in the bottom frame.
Give the same drop shadow.
7.
Open Flergs_CircusMagic_Hat2– copy - paste on the image.
Place it in the frame above.
Give the same drop shadow.
8.
Open Flergs_CircusMagic_JugglingBalls– copy - paste on the image.
Place it in the frame above.
Give the same drop shadow.
9.
Open KAagard_CircusMagic_Balloon1– copy - paste on the image.
Place it in the upper frame.
Give the same drop shadow.
10.
Open WA-Circus is Coming– copy - paste on the image.
Place it in the middle at the top. Must be the same with the upper side of the
frame.
Give the same drop shadow.
11.
Open Flergs_CircusMagic_Flags1– copy - paste on the image.
Place it at the top in the middle.
Give the same drop shadow.
12.
Open de poser tube mardigras15 - copy - paste on the image.
Place it in the middle at the bottom.
Give the same drop shadow.
13.
Open de ballonnen - copy - paste on the image.
Place it right at the top.
Give the same drop shadow.
Layers – duplicate.
Place it right at the bottom.
Layers – duplicate.
Place it left in the middle against the frame.
14.
Layers - new raster layer - set your watermark into the image.
Layers - merge - merge all visible layers.
File - export - PNG Optimizer.
Ready is the tag
I hope you like this tutorial.
greetings Emmy