This
Tutorial is copyrighted to the Tutorial Writer, © Emmy Kruyswijk.
This Tutorial may not be forwarded, shared or otherwise placed on any Web Site
or group without written
permission from Emmy Kruyswijk.
Please respect my work and from others, don't change the file names.
Do you want to link my lessons?
Please send me a mail.
Needing:
I use parts of different scrapkits and the internet.
The poser tube is a buy tube of me. Is not by the material. You can buy it
here.
Before you begins.......
Open the tubes in PSP
Open de tubes in PSP
Material

't Avondje van Sinterklaas

1.
Open new transparent image 800x800.
2.
Open Emmymask – copy - paste on the image.
3.
Open NLD Moon – copy - paste on the image.
Place this at the end of the bottom.
4.
Open raam – copy - paste on the image.
Place it right at the bottom.
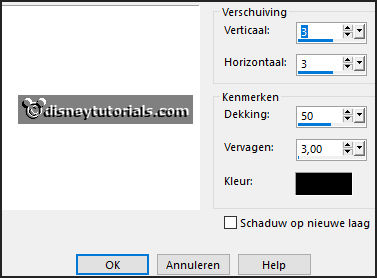
Effects – 3D Effects – drop shadow – with this setting.

5.
Open raambgr – copy - paste on the image.
Place this on the window.
Layers – arrange – down.
6.
Open boom – copy - paste on the image.
Place this on the raambgr.
7.
Open NLD Moon – copy - paste on the image.
Place this in the top left window.
Activate the top layer.
8.
Open kachel – copy - paste on the image.
Place this left under the window – see example.
Give the same drop shadow.
9.
Open klomp – copy - paste on the image.
Place this in the front of the stove in the middle.
Give the same drop shadow.
10.
Open plant –copy - paste on the image.
Place this right of the stove.
Give the same drop shadow.
11.
Open zak – copy - paste on the image.
Place it right at the bottom.
Give the same drop shadow.
12.
Open Spielzeug-06– copy - paste on the image.
Place it right at the bottom.
Give the same drop shadow.
13.
Open Spielzeug-20– copy - paste on the image.
Place it right at the bottom.
Give the same drop shadow.
14.
Open WA-Emmy– copy - paste on the image.
Place this left at the top.
15.
Open de poser tube– copy - paste on the image.
Place it to the left side.
Give the same drop shadow.
16.
Layers - new raster layer - set your watermark into the image.
Layers - merge - merge all visible layers.
File - export - PNG Optimizer.
Ready is the tag
I hope you like this tutorial.
greetings Emmy