1.
File - open new transparent image 700x700.
Convert to raster layer.
Fill the layer with the color white.
2.
Activate the background -
edit - copy.
Edit - paste as a new layer on the image.
Image - resize 115% - all layers not checked.
3.
Activate the tube Célébration-CR=Lacarolita -
edit - copy.
Edit - paste as a new layer on the image.
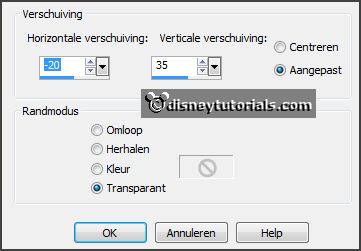
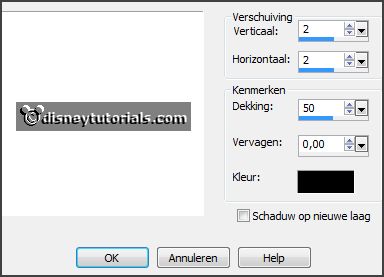
Effects - Image effects - offset - with this setting.
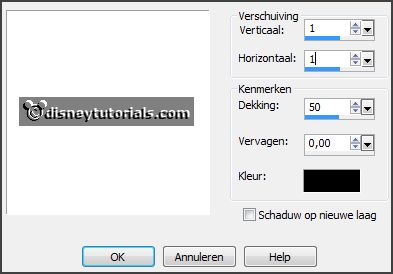
Effects - 3D Effects - drop shadow -
with this setting.
4.
Layers - duplicate.
Activate raster 3.
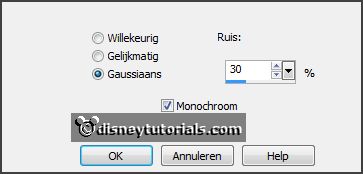
Adjust - add/remove noise - add noise - with this setting.
Activate copy of raster 2.
Repeat noise - now with noise to 40.
Duplicate raster 3 - change the name in copy(1) of raster 3.
Layers - arrange - down.
You have now this.
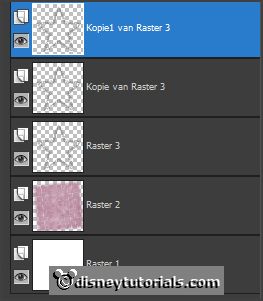
Lock the 2 top layers.
5.
Activate the tube EileensDesign_CUvol108-1 -
edit - copy.
Edit - paste as a new layer on the image.
Activate move tool - set it left at the bottom - see example.
Effects - 3D Effects - drop shadow -
with this setting.
6.
Activate the poser tube -
edit - copy.
Edit - paste as a new layer on the image.
Place it left - between the figures 0 and 1 -
see example.
Effects - 3D Effects - drop shadow - setting is right.
7.
Activate the tube EileensDesign_CUvol107-8 -
edit - copy.
Edit - paste as a new layer on the image.
Layers - arrange - down.
Place it near the cubes -
see example.
Effects - 3D Effects - drop shadow - setting is right.
8.
Activate the tube EileensDesign_CUvol107-4 -
edit - copy.
Edit - paste as a new layer on the image.
Place it left of the cooler -
see example.
Effects - 3D Effects - drop shadow - setting is right.
9.
Activate the tube EileensDesign_CUvol104-2 -
edit - copy.
Edit - paste as a new layer on the image.
Place it right of the cooler -
see example.
Effects - 3D Effects - drop shadow - setting is right.
10.
Layers - new raster layers - put your watermark into the image.
Lock raster 5 and make the bottom layer active.
Edit - copy merged.
Open Animatie Shop - paste as a new animation.
11.
Back in PSP.
Lock raster 3 and open copy of raster 3.
Edit - copy merged.
In AS - paste after active frame.
12.
Back in PSP.
Lock copy of raster 3 and open copy1 of raster 3.
Edit - copy merged.
In AS -
paste after active frame - be sure the last frame is selected.
Edit - select all.
13.
Open animation Emmyvuurwerk - edit - select all.
Edit - copy.
Edit - paste in selected frames.
Place it in the middle of the star - a little up -
see example.
14.
Back to PSP.
Open raster 5 and activate this.
Edit - copy.
15.
In AS -
paste as a new animation.
Edit -
duplicate selected and 1 more time.
Edit - select all.
Edit - copy.
Edit - paste in selected frames.
Be sure the tag is still selected.
Place it
between the figures 0 and 1.
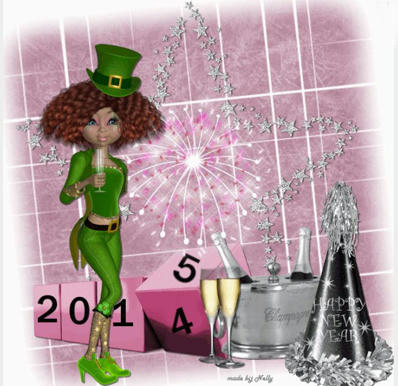
16.
File - save as - give name - click 3 times at next and than at finish.
Ready is the tag
I hope you like this tutorial.
greetings Emmy
Thank you Nelly for testing.

tutorial written
21-12-2014