1.
File - open new transparent image 700x700.
Activate the tube summerMoments_moleminaScrap_el (24) -
edit - copy.
Edit - paste as a new layer on the image.
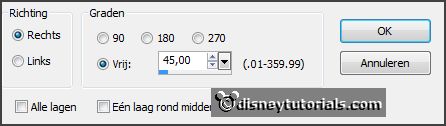
Image - free rotate - with this setting.
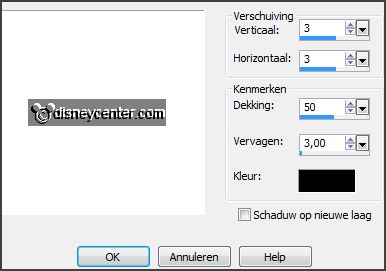
Effects - 3D Effects - drop shadow -
with this setting.
2.
Layers - new raster layers.
Activate freehand selection tool - from point to point - and make a
selection - as below.
Set the foreground color to #dfa697.
Fill the selection with the foreground color.
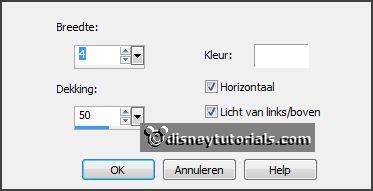
Effects - Texture effects - blinds - with this setting.
Selections - select none.
Layers - arrange - move down.
Activate the top layer.
Layers - merge - merge down.
Activate move tool - place it a little to the left - see example.
3.
Activate the tube summerMoments_moleminaScrap_el (44) -
edit - copy.
Edit - paste as a new layer on the image.
Place it to the right side -
see example.
Effects - 3D Effects - drop shadow - setting is right.
4.
Activate the tube summerMoments_moleminaScrap_el (32) -
edit - copy.
Edit - paste as a new layer on the image.
Place ir diagonal under the strawberries branche -
see example.
Effects - 3D Effects - drop shadow - setting is right.
5.
Activate the tube summerMoments_moleminaScrap_el (47) -
edit - copy.
Edit - paste as a new layer on the image.
Place it under the grass and the
strawberries branche -
see example.
Effects - 3D Effects - drop shadow - setting is right.
6.
Activate the tube summerMoments_moleminaScrap_el (17) -
edit - copy.
Edit - paste as a new layer on the image.
Place it at the left side at the bottom -
see example.
Effects - 3D Effects - drop shadow - setting is right.
7.
Activate the tube ASB_SummerBerries_element28 -
edit - copy.
Edit - paste as a new layer on the image.
Place it left at the bottom -
see example.
Effects - 3D Effects - drop shadow - setting is right.
8.
Activate the tube Strawberries_TSOS_element_28 -
edit - copy.
Edit - paste as a new layer on the image.
Place it left near the strawberry at the bottom -
see example.
Effects - 3D Effects - drop shadow - setting is right.
9.
Activate the tube summerMoments_moleminaScrap_el (6) -
edit - copy.
Edit - paste as a new layer on the image.
Place it in the middle at the bottom -
see example.
Effects - 3D Effects - drop shadow - setting is right.
Layers - duplicate.
Image - resize 75% - all layers not checked.
Place it left near the other -
see example.
10.
Activate the posertube zomer -
edit - copy.
Edit - paste as a new layer on the image.
Place it at the left side -
see example.
Layers - arrange - move down - set it under raster 4.
Effects - 3D Effects - drop shadow - setting is right.
11.
Activate the top layer.
Activate the tube Summer -
edit - copy.
Edit - paste as a new layer on the image.
Place it in the middle at the top -
see example.
12.
Layers - new raster layer - set your watermark into the image.
Layers - merge - merge all visible layers.
File - export - PNG Optimizer.
Ready is the tag
I hope you like this tutorial.
greetings Emmy
Thank you Nelly for testing.