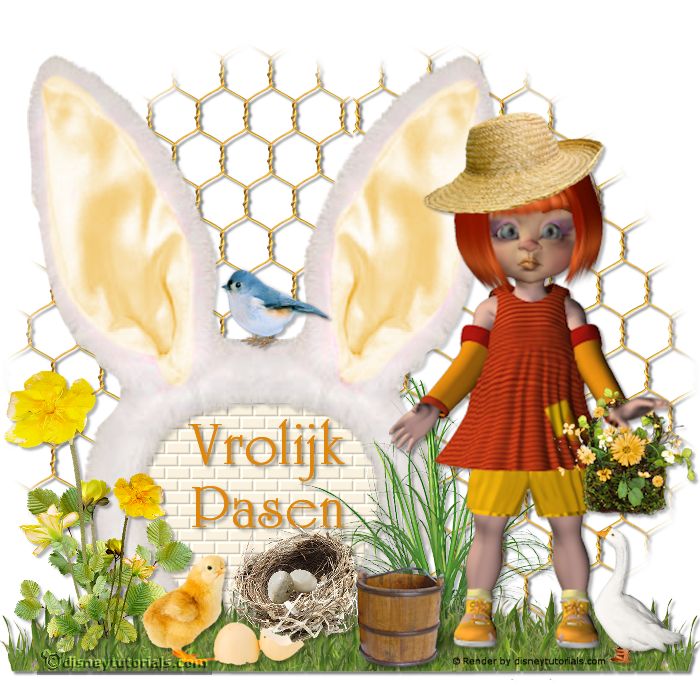
1.
File - open new transparent image 700x700.
Set the foreground color to #f9f0dd.
2.
Activate the tube DBV Easter 2010 element (18) -
edit - copy.
Edit - paste as a new layer on the image.
Objects - Align - left.
Layers - duplicate.
Image - mirror.
3.
Activate selection tool - rectangle - and make a selection - start above by 350
to the left till the bottom - see below.
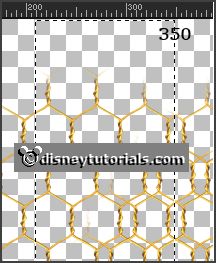
Click at the delete key.
Move the selection to the right (mouse click keep right holding) and Click at the delete
key. Selection must stay also at 350 at the top.
Layers - merge - merge down.
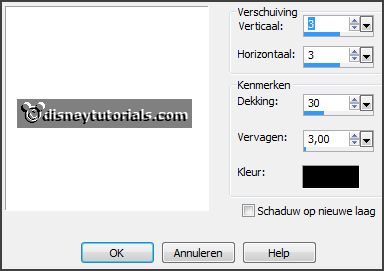
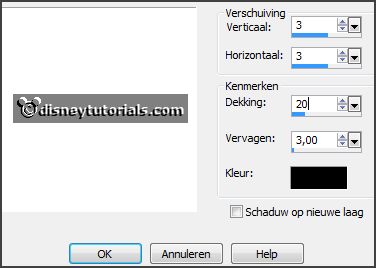
Effects - 3D Effects - drop shadow - with this setting.
4.
Activate the tube element13 -
edit - copy.
Edit - paste as a new layer on the image.
Activate move tool - set it left at the bottom.
Layers - duplicate.
Image - mirror.
Layers - merge - merge down.
Effects - 3D Effects - drop shadow -
setting is right.
5.
Activate the tube element39 -
edit - copy.
Edit - paste as a new layer on the image.
Place it left - see example.
Effects - 3D Effects - drop shadow - with this setting.
Layers - arrange - down.
6.
Layers - new raster layers.
Make a selection - ellipse - as below.
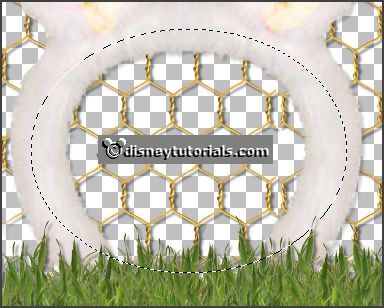
Fill the selection with the foreground color.
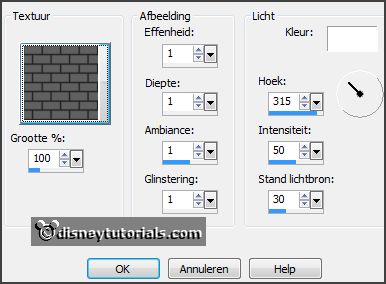
Effects - Texture effects - Texture - bakstenen middle size - with this setting.
Layers - arrange - down.
Selections - select none.
7.
Activate the tube vrpasen -
edit - copy.
Edit - paste as a new layer on the image.
Place it on the stones - see example.
8.
Activate the tube element2 -
edit - copy.
Edit - paste as a new layer on the image.
Place it in the middle of the frame - see example.
Image - resize 75% - all layers not checked.
Effects - 3D Effects - drop shadow -
setting is right.
9.
Activate the tube element19 -
edit - copy.
Edit - paste as a new layer on the image.
Place it left at the bottom - see example.
Effects - 3D Effects - drop shadow -
setting is right.
10.
Activate the tube nest -
edit - copy.
Edit - paste as a new layer on the image.
Place it near the flowers at the bottom - see example.
Effects - 3D Effects - drop shadow -
setting is right.
11.
Activate the tube element1 -
edit - copy.
Edit - paste as a new layer on the image.
Image - mirror.
Place it between the flowers and the nest at the bottom - see example.
Effects - 3D Effects - drop shadow -
setting is right.
12.
Activate the tube element30 -
edit - copy.
Edit - paste as a new layer on the image.
Place it in the middle at the bottom - see example.
Layers - arrange - down - place it under raster 2.
Effects - 3D Effects - drop shadow -
setting is right.
13.
Activate the top layer.
Activate the tube element52 -
edit - copy.
Edit - paste as a new layer on the image.
Place it before the grass at the bottom - see example.
Effects - 3D Effects - drop shadow -
setting is right.
14.
Activate the poser tube kiki met mand -
edit - copy.
Edit - paste as a new layer on the image.
Place it right at the bottom - see example.
Effects - 3D Effects - drop shadow -
setting is right.
15.
Activate the tube element41 -
edit - copy.
Edit - paste as a new layer on the image.
Image - mirror.
Place it right at the bottom - see example.
Effects - 3D Effects - drop shadow -
setting is right.