1.
File - open new transparent image 700x700.
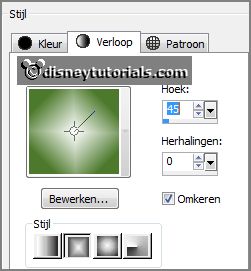
Set the foreground color to #4c792c and the background color to white.
Make from the foreground a gradient rectangular - with this setting.

2.
Activate the tube Emmyrand -
edit - copy.
Edit - paste as a new layer on the image.
Activate move tool - set it a little down.
3.
Activate the magic wand and select in the middle of the frame.
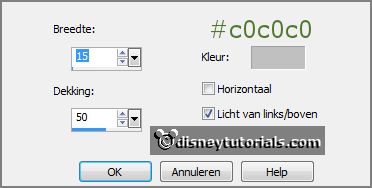
Selections - modify - expand 15 pixels.
Layers - new raster layer.
Fill the selection with the gradient.
Selections - select none.
Effects - Texture effects - Texture - Blinds - Edit - with this setting.

Layers - arrange - down.
Activate the top layer.
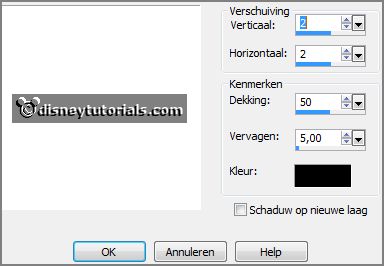
Effects - 3D Effects - drop shadow - with this setting.

4.
Activate the poser tube kids4-1 -
edit - copy.
Edit - paste as a new layer on the image.
Move it down.
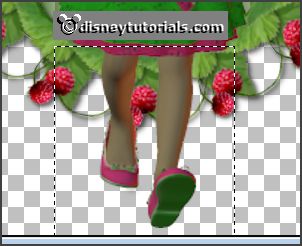
Activate selection tool - rectangle - and make a selection - as below - click at
the delete key.

Selections - select none.
5.
Activate the tube element (78) -
edit - copy.
Edit - paste as a new layer on the image.
Place it left at the top -
see example.
Layers - arrange - down - set it under raster 2.
Effects - 3D Effects - drop shadow -
setting is right.
6.
Activate the tube beautiful Live by Mago74 WA( )2 -
edit - copy.
Edit - paste as a new layer on the image.
Place it right at the top -
see example.
7.
Activate the tube element (30) -
edit - copy.
Edit - paste as a new layer on the image.
Place it left of the frame -
see example.
Effects - 3D Effects - drop shadow -
setting is right.
Layers - duplicate.
Place it to the right and a little down.
Layers - merge - merge down.
8.
Activate the tube element (2) -
edit - copy.
Edit - paste as a new layer on the image.
Place it in the middle at the bottom -
see example.
Effects - 3D Effects - drop shadow -
setting is right.
9.
Activate the tube element (45) -
edit - copy.
Edit - paste as a new layer on the image.
Place it in the middle at the bottom -
see example.
Effects - 3D Effects - drop shadow -
setting is right.
10.
Activate the tube element (17) -
edit - copy.
Edit - paste as a new layer on the image.
Image - resize 2 x 85% - all layers not checked.
Place it to the right side -
see example.
Effects - 3D Effects - drop shadow -
setting is right.
Layers - arrange - down - set it under raster 2.
11.
Activate the top layer.
Activate the tube element (21) -
edit - copy.
Edit - paste as a new layer on the image.
Place it left at the bottom -
see example.
Effects - 3D Effects - drop shadow -
setting is right.
12.
Activate the tube element (25) -
edit - copy.
Edit - paste as a new layer on the image.
Place it left at the bottom - see example.
Effects - 3D Effects - drop shadow -
setting is right.
Layers - duplicate.
Image - mirror.
Place it right from the leave and a little down -
see example.
13.
Activate the tube element (31) -
edit - copy.
Edit - paste as a new layer on the image.
Place it left at the bottom -
see example.
Effects - 3D Effects - drop shadow -
setting is right.
14.
Activate the tube element (35) -
edit - copy.
Edit - paste as a new layer on the image.
Place it in the middle (left) at the bottom -
see example.
Effects - 3D Effects - drop shadow -
setting is right.
Layers - arrange - down.
15.
Activate the tube element (21).
Image - rotate right.
Edit - copy - edit - paste as a new layer on the image.
Image - resize 85% - all layers not checked.
Image - free rotate - with this setting.

Effects - 3D Effects - drop shadow -
setting is right.
Place it right at the bottom -
see example.
Layers - arrange - down - set it under raster 2.
16.
Activate the top layer.
Activate the tube element (12) -
edit - copy.
Edit - paste as a new layer on the image.
Place it right at the bottom
- see example.
Activate raster 2.
Effects - 3D Effects - drop shadow -
setting is right.
17.
Layers - new raster layer - set your watermark into the image.
Layers - merge - merge all visible layers.
File - export - PNG Optimizer.
Ready is the tag
I hope you like this tutorial.
greetings Emmy
Thank you Nelly for testing.