1.
File - open new transparent image 700x700.
Activate the tube Emmymask -edit - copy.
Edit - paste as a new layer on the image.
2.
Activate the tube Le Petit Scrap (92) -
edit - copy.
Edit - paste as a new layer on the image.
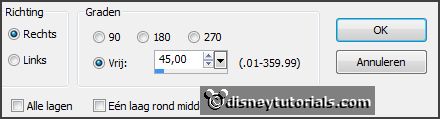
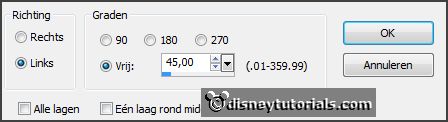
Image - free rotate - with this setting.
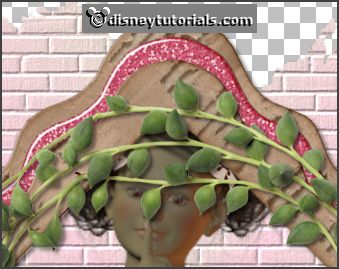
Objects - Align - center on canvas.
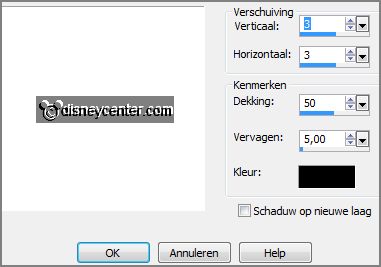
Effects - 3D Effects - drop shadow - with this setting.
3.
Activate the tube Le Petit Scrap (31) -
edit - copy.
Edit - paste as a new layer on the image.
Image - mirror.
Effects - 3D Effects - drop shadow -
setting is right.
4.
Activate raster 1.
Activate the poser tube kids4-27 -
edit - copy.
Edit - paste as a new layer on the image.
Activate move tool - place it so that the head stays here - see below.
Activate free hand selection tool - from point to point - and make a
selection - as below.
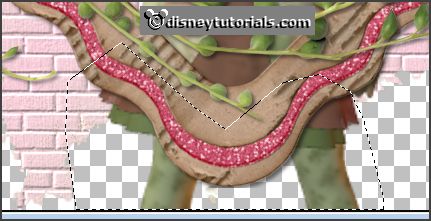
Click at the delete key.
Selections - select none.
5.
Layers - duplicate.
Layers - arrange - bring to top.
Set the opacity to 65.
Activate the eraser and erase the part on the frame.
Set the opacity back to 100.
Now you see that something by the hand -erase that also.
Effects - 3D Effects - drop shadow -
setting is right.
6.
Activate the tube Le Petit Scrap (81) -
edit - copy.
Edit - paste as a new layer on the image.
Place it at the right side.
Effects - 3D Effects - drop shadow -
setting is right.
Layers - arrange - down.
7.
Activate the tube Le Petit Scrap (59) -
edit - copy.
Edit - paste as a new layer on the image.
Image - mirror.
Place it right at the bottom - see example.
Layers - arrange - down - set it under copy of raster 4.
Effects - 3D Effects - drop shadow -
setting is right.
8.
Activate the top layer.
Activate the tube Le Petit Scrap (51) -
edit - copy.
Edit - paste as a new layer on the image.
Place it right at the bottom - see example.
Effects - 3D Effects - drop shadow -
setting is right.
9.
Activate the top layer.
Activate the tube Le Petit Scrap (43) -
edit - copy.
Edit - paste as a new layer on the image.
Place it in the middle at the bottom - see example.
Effects - 3D Effects - drop shadow -
setting is right.
10.
Activate the tube Le Petit Scrap (88) -
edit - copy.
Edit - paste as a new layer on the image.
Place it left at the bottom - see example.
Effects - 3D Effects - drop shadow -
setting is right.
Layers - arrange - down.
11.
Activate the tube Le Petit Scrap (96) -
edit - copy.
Edit - paste as a new layer on the image.
Place it left at the bottom - see example.
Effects - 3D Effects - drop shadow -
setting is right.
12.
Activate the tube Le Petit Scrap (53) -
edit - copy.
Edit - paste as a new layer on the image.
Place it left of the cat - see example.
Effects - 3D Effects - drop shadow -
setting is right.
13.
Activate the tube Le Petit Scrap (60) -
edit - copy.
Edit - paste as a new layer on the image.
Place it left at the bottom - see example.
Effects - 3D Effects - drop shadow -
setting is right.
Layers - arrange - down - set it under raster 9.
14.
Activate the tube RR_CircleOfFriends_Alhpa_Word3 -
edit - copy.
Edit - paste as a new layer on the image.
Image - free rotate - with this setting.
Place it left at the bottom - see example.
Effects - 3D Effects - drop shadow -
setting is right.
15.
Layers - new raster layer - set your watermark into the image.
Layers - merge - merge all visible layers.
File - export - PNG Optimizer.
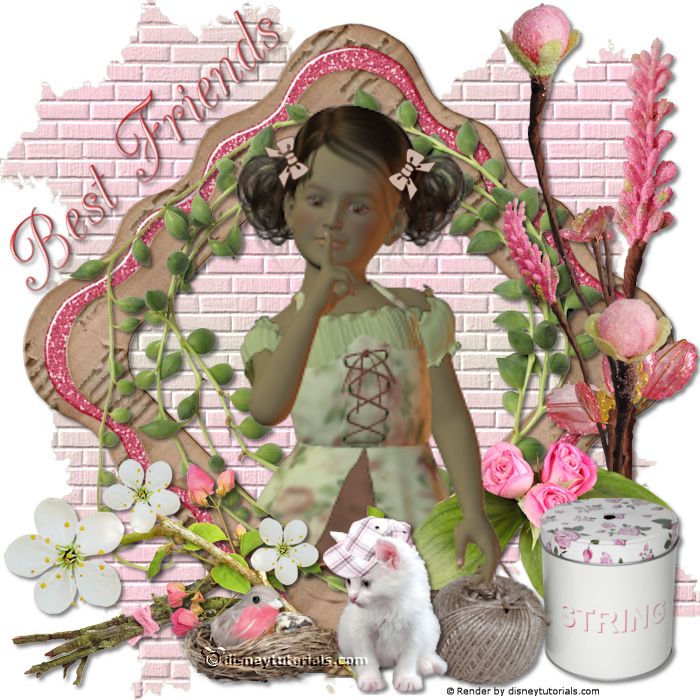
Ready is the tag
I hope you like this tutorial.
greetings Emmy
Thank you Nelly for testing.


tutorial written
04-02-2015