1.
File - open new transparent image 700x700.
Activate the tube IndigoD_BreathOfSoring_pp(10) -
edit - copy.
Edit - paste as a new layer on the image.
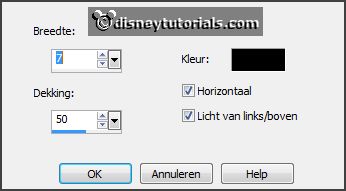
Effects - Texture effects - Blinds - with this setting.

2.
Activate the tube Lilas-Lovely-Spring_add-on(7) -
edit - copy.
Edit - paste as a new layer on the image.
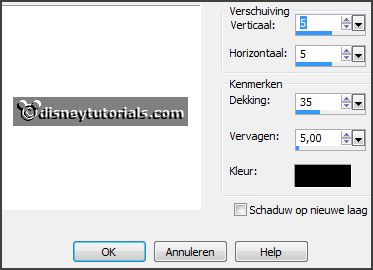
Effects - 3D Effects - drop shadow - with this setting.

3.
Activate the tube IndigoD_BreathOfSoring_el(38) -
edit - copy.
Edit - paste as a new layer on the image.
Activate move tool - place it left at the top of the frame.
Effects - 3D Effects - drop shadow - setting is right.
4.
Activate the tube IndigoD_BreathOfSoring_el(45) -
edit - copy.
Edit - paste as a new layer on the image.
Place it right on the frame - see example.
Effects - 3D Effects - drop shadow - setting is right.
5.
Activate the tube IndigoD_BreathOfSoring_wa -
edit - copy.
Edit - paste as a new layer on the image.
Place it right at the top - see example.
Effects - 3D Effects - drop shadow - setting is right.
6.
Activate the tube IndigoD_BreathOfSoring_ac3 -
edit - copy.
Edit - paste as a new layer on the image.
Place it left at the bottom - see example.
Effects - 3D Effects - drop shadow - setting is right.
Layers - duplicate.
Image - mirror.
Move it a little to the left.
7.
Activate the tube IndigoD_BreathOfSoring_el(46) -
edit - copy.
Edit - paste as a new layer on the image.
Image - mirror.
Place it left - see example.
Layers - arrange - down - set it under raster 6.
8.
Activate the tube IndigoD_BreathOfSoring_el(41) -
edit - copy.
Edit - paste as a new layer on the image.
Place it right at the bottom - see example.
Effects - 3D Effects - drop shadow - setting is right.
Activate the top layer.
9.
Activate the tube Lilas-Lovely-Spring_add-on(6) -
edit - copy.
Edit - paste as a new layer on the image.
Image - mirror.
Place it right at the bottom - see example.
Effects - 3D Effects - drop shadow - setting is right.
10.
Activate the poser tube-
edit - copy.
Edit - paste as a new layer on the image.
Place it in the middle at the bottom.
Effects - 3D Effects - drop shadow - setting is right.
11.
Layers - new raster layer - set your watermark into the image.
Layers - merge - merge all visible layers.
File - export - PNG Optimizer.
Ready is the tag
I hope you like this tutorial.
greetings Emmy
Thank you Nelly for testing.