|

This
Tutorial is copyrighted to the Tutorial Writer, © Emmy Kruyswijk.
This Tutorial may not be forwarded, shared or otherwise placed on any Web Site
or group without written
permission from
Emmy Kruyswijk.
Please respect my work and don't change the file names.
Do you want to link my lessons?
Please send
me a mail.
Needing:
The poser tube is from me. My site you can find
here.
2 tubes from me.
I use parts of the scrapkits of Simple Garden from Hakia D.
Before you begins.......
Open the tubes in PSP.
Material

Garden

1.
File - open new transparent image 700x700.
Activate the tube Emmybackground -
edit - copy.
Edit - paste as a new layer on the image.
2.
Activate the tube Emmyraster -
edit - copy.
Edit - paste as a new layer on the image.
Activate move tool - place it in the left upper corner.
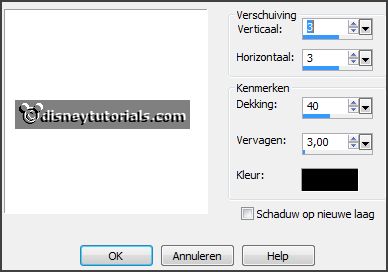
Effects - 3D Effects - drop shadow - with this setting.

3.
Activate the tube hakiad_element35 -
edit - copy.
Edit - paste as a new layer on the image.
Place it to the right.
Effects - 3D Effects - drop shadow - setting is right.
4.
Activate the tube hakiad_element1 -
edit - copy.
Edit - paste as a new layer on the image.
Place a little to the left.
Effects - 3D Effects - drop shadow - setting is right.
Activate the magic wand - feather on 0 - select in the middle of the frame.
Selections - modify - expand 10 pixels.
5.
Layers - new raster layer.
Activate hakiad_paper8 -
edit - copy.
Edit - paste in selection.
Layers - arrange - move down.
Selections - select none.
6.
Activate the poser tube kids4-45 -
edit - copy.
Edit - paste as a new layer on the image.
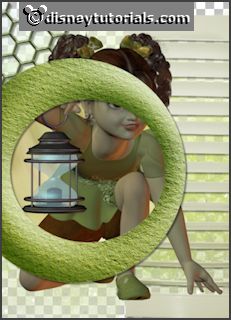
Place it as below.

Activate the eraser - and erase the knee and foot.
Layers - duplicate.
Layers - arrange - move up.
Effects - 3D Effects - drop shadow - setting is right.
Erase now the part, what on the frame is (not the arm).
7.
Activate the tube hakiad_element27 -
edit - copy.
Edit - paste as a new layer on the image.
Place it to the left.
Effects - 3D Effects - drop shadow - setting is right.
8.
Activate the tube hakiad_element23 -
edit - copy.
Edit - paste as a new layer on the image.
Place it to the left.
Effects - 3D Effects - drop shadow - setting is right.
9.
Activate the tube hakiad_element14 -
edit - copy.
Edit - paste as a new layer on the image.
Place it to the left on the wheel.
Effects - 3D Effects - drop shadow - setting is right.
10.
Activate the tube hakiad_element45 -
edit - copy.
Edit - paste as a new layer on the image.
Image - mirror.
Place it to the left on the wheel - see example.
Effects - 3D Effects - drop shadow - setting is right.
11.
Activate the tube hakiad_element47 -
edit - copy.
Edit - paste as a new layer on the image.
Image - free rotate - with this setting.

Place it left at the top.
Layers - duplicate.
Image - mirror.
Place it to the left -
see example.
Effects - 3D Effects - drop shadow - setting is right.
12.
Activate the tube hakiad_element33 -
edit - copy.
Edit - paste as a new layer on the image.
Place it left at the bottom.
Effects - 3D Effects - drop shadow - setting is right.
13.
Activate the tube hakiad_element44 -
edit - copy.
Edit - paste as a new layer on the image.
Place it at the right side.
Effects - 3D Effects - drop shadow - setting is right.
14.
Activate the tube hakiad_element27 -
edit - copy.
Edit - paste as a new layer on the image.
Place it at the right side.
Effects - 3D Effects - drop shadow - setting is right.
Layers - arrange - move down - set it under raster 4.
Layers - duplicate.
Image - flip.
Move a little.
Layers - arrange - move down - set it under raster 6.
15.
Activate the tube hakiad_element7 -
edit - copy.
Edit - paste as a new layer on the image.
Place it at the right side on the leaves.
Effects - 3D Effects - drop shadow - setting is right.
16.
Activate the top layer.
Activate the tube hakiad_element40-
edit - copy.
Edit - paste as a new layer on the image.
Place it at the right side at the bottom -
see example.
Effects - 3D Effects - drop shadow - setting is right.
17.
Activate the tube hakiad_element37-
edit - copy.
Edit - paste as a new layer on the image.
Place it at the right side at the bottom -
see example.
Effects - 3D Effects - drop shadow - setting is right.
18.
Activate the tube hakiad_element42-
edit - copy.
Edit - paste as a new layer on the image.
Place it at the right side at the bottom -
see example.
Effects - 3D Effects - drop shadow - setting is right.
19.
Activate the tube hakiad_element13-
edit - copy.
Edit - paste as a new layer on the image.
Place it in the middle at the bottom - see
example.
Effects - 3D Effects - drop shadow - setting is right.
20.
Layers - new raster layer - set your watermark into the image.
Layers - merge - merge all visible layers.
File - export - PNG Optimizer.
Ready is the tag
I hope you like this tutorial.
greetings Emmy
Thank you Nelly for testing.


tutorial written
06-03-2015 |