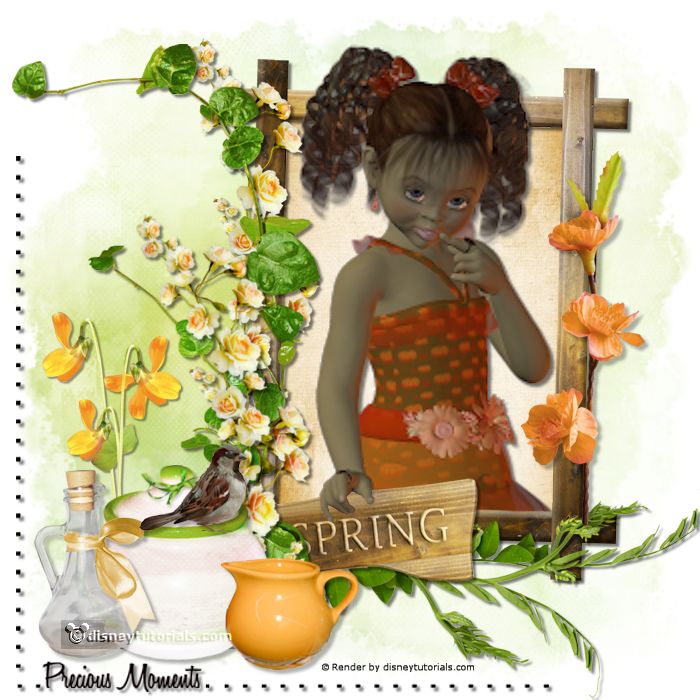
1.
File - open new transparent image 700x700.
Activate Emmybgmask -
edit - copy.
Edit - paste as a new layer on the image.
2.
Activate the tube florju_piquenique_wa(6) -
edit - copy.
Edit - paste as a new layer on the image.
Activate move tool - set it left at the bottom.
Effects - 3D Effects - drop shadow - with this setting.
3.
Activate the tube florju_piquenique_elmt(71) -
edit - copy.
Edit - paste as a new layer on the image.
Place it a little up and to the right.
Effects - 3D Effects - drop shadow - setting is right.
4.
Activate the
magic wand -
feather on 0 - select in the middle of the frame.
Selections - modify - expand 10 pixels.
Layers - new raster layers.
5.
Activate florju_piquenique_pp(7) -
edit - copy.
Edit - paste in selection.
Layers - arrange - down.
6.
Activate the poser tube kids4-55 -
edit - copy.
Edit - paste as a new layer on the image.
Activate selections tool - rectangle - and make a selection as below.
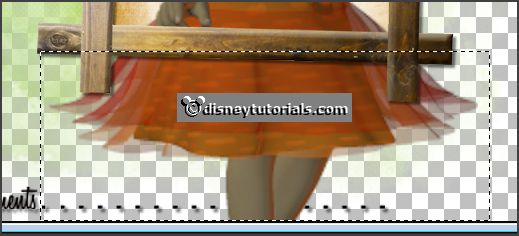
Click on the delete key.
Selections - select none.
Layers - duplicate.
Layers - arrange - up.
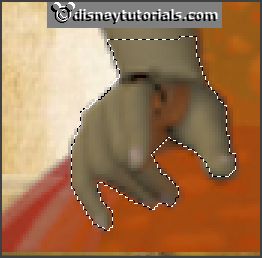
7.
The following can be different of the tube.
I want the hand over the gate, so I'm going to detach the hand from the
arm.
Set the image size to 300 by clicking on the zoom in.
8.
Activate free hand selection tool - from point to point - and make a selection
as below.
Edit - copy.
Layers - new raster layers.
Edit - paste in selection.
Selections - select none.
Effects - 3D Effects - drop shadow - setting is right.
Activate the eraser - and erase the part on the frame.
9.
Activate the tube florju_piquenique_elmt(65) -
edit - copy.
Edit - paste as a new layer on the image.
Place it left at the bottom on the frame.
Effects - 3D Effects - drop shadow - setting is right.
Layers - arrange - down.
Activate the top layer.
10.
Activate the tube florju_piquenique_elmt(82) -
edit - copy.
Edit - paste as a new layer on the image.
Place it right of the frame.
Effects - 3D Effects - drop shadow - setting is right.
11.
Activate the tube florju_douce_innocence_elmt(22) -
edit - copy.
Edit - paste as a new layer on the image.
Place it in the middle at the bottom of the frame.
Effects - 3D Effects - drop shadow - setting is right.
Layers - arrange - down
- set it under raster 7.
Activate the top layer.
12.
Activate the tube bloemen -
edit - copy.
Edit - paste as a new layer on the image.
Place it left on the frame.
Effects - 3D Effects - drop shadow - setting is right.
13.
Activate the tube florju_piquenique_elmt(38) -
edit - copy.
Edit - paste as a new layer on the image.
Place it left of the frame on the flowers.
Effects - 3D Effects - drop shadow - setting is right.
14.
Activate the tube florju_piquenique_elmt(36) -
edit - copy.
Edit - paste as a new layer on the image.
Place it left and a little down of the frame on the branche.
Effects - 3D Effects - drop shadow - setting is right.
15.
Activate the tube florju_piquenique_elmt(50) -
edit - copy.
Edit - paste as a new layer on the image.
Place it left of the frame frame.
Effects - 3D Effects - drop shadow - setting is right.
16.
Activate the tube florju_piquenique_elmt(29) -
edit - copy.
Edit - paste as a new layer on the image.
Place these left above the pot - see example.
Effects - 3D Effects - drop shadow - setting is right.
Layers - arrange - down.
Activate the top layer.
17.
Activate the tube florju_piquenique_elmt(58) -
edit - copy.
Edit - paste as a new layer on the image.
Place these left of the pot - see example.
Effects - 3D Effects - drop shadow - setting is right.
18.
Activate the tube florju_piquenique_elmt(60) -
edit - copy.
Edit - paste as a new layer on the image.
Place these right of the pot - see example.
Effects - 3D Effects - drop shadow - setting is right.
19.
Activate the tube florju_piquenique_elmt(86) -
edit - copy.
Edit - paste as a new layer on the image.
Place these on the pot - see example.
Effects - 3D Effects - drop shadow - setting is right.
Thank you Nelly for testing.