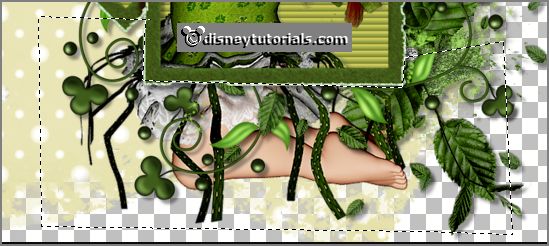
1.
File - open new transparent image 700x700.
Activate Emmybackground - edit - copy.
Edit - paste as a new layer on the image.
2.
Activate the tube BNB-lcao2 - edit - copy.
Edit - paste as a new layer on the image.
Activate move tool - place it right at the top.
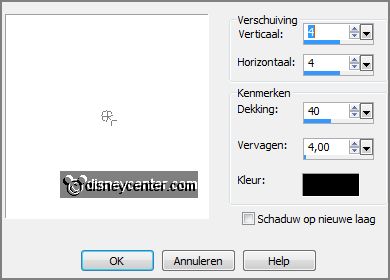
Effects - 3D Effects - drop shadow - with this setting.
3.
Activate the tube BNB-lcao32 - edit - copy.
Edit - paste as a new layer on the image.
Effects - 3D Effects - drop shadow - setting is right.
Activate the
magic wand -
feather on 0 - select in the middle of the frames.
4.
Layers - new raster layer.
Activate BNB-LcaoP1 - edit - copy.
Edit - paste in selection.
Layers - arrange - down.
Selections - select none.
5.
Activate the posertube stpatrick - edit - copy.
Edit - paste as a new layer on the image.
Activate free hand selection tool - from point to point - and make a
selection as below.
Click at the delete key.
Selections - select none.
Layers - duplicate.
Layers - arrange - up.
Effects - 3D Effects - drop shadow - setting is right.
Activate the eraser - and erase the part of the dress on the frame.
6.
Activate the tube BNB-lcao15 - edit - copy.
Edit - paste as a new layer on the image.
Place it right at the bottom.
Effects - 3D Effects - drop shadow - setting is right.
7.
Activate the tube BNB-lcao13 - edit - copy.
Edit - paste as a new layer on the image.
Place it left at the bottom - see example.
Effects - 3D Effects - drop shadow - setting is right.
8.
Activate the tube BNB-lcao12 - edit - copy.
Edit - paste as a new layer on the image.
Place it left of the heart - see example.
Effects - 3D Effects - drop shadow - setting is right.
9.
Activate the tube BNB-lcao14 - edit - copy.
Edit - paste as a new layer on the image.
Image - mirror.
Place it left between the bottle and the heart - see example.
Effects - 3D Effects - drop shadow - setting is right.
10.
Activate the tube BNB-lcao25 - edit - copy.
Edit - paste as a new layer on the image.
Place it in the left frame - see example.
Effects - 3D Effects - drop shadow - setting is right.
11.
Activate the tube BNB-lcao28 - edit - copy.
Edit - paste as a new layer on the image.
Place it left at the top - see example.
Effects - 3D Effects - drop shadow - setting is right.
Thank you Nelly for testing.