1.
File - open new transparent image 700x700.
Activate Emmymask -
edit - copy.
Edit - paste as a new layer on the image.
2.
Activate the tube Deco-11 -
edit - copy.
Edit - paste as a new layer on the image.
Activate move tool - place it in the right upper corner.
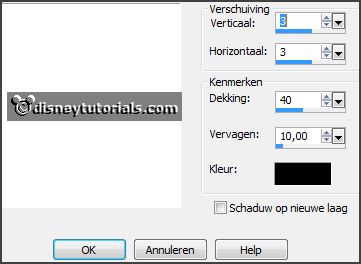
Effects - 3D Effects - drop shadow - with this setting.

3.
Activate the tube Temp of Megaera -
edit - copy.
Edit - paste as a new layer on the image.
Effects - 3D Effects - drop shadow -
setting is right.
4.
Activate the tube Deco-03 -
edit - copy.
Edit - paste as a new layer on the image.
Place it at the right side.
Effects - 3D Effects - drop shadow -
setting is right.
Layers - duplicate.
Image - resize 85% - all layers not checked.
Place it near the other - see example.
5.
Activate the tube Deco-14 -
edit - copy.
Edit - paste as a new layer on the image.
Place it at the right side - see example.
Effects - 3D Effects - drop shadow -
setting is right.
6.
Activate the tube Tráva(2) -
edit - copy.
Edit - paste as a new layer on the image.
Place it at the left side - see example.
Effects - 3D Effects - drop shadow -
setting is right.
Layers - duplicate.
Image - resize 50% - all layers not checked.
Place it left of the other.
Layers - duplicate.
Place it right of the other.
7.
Activate the tube Emmyword-art -
edit - copy.
Edit - paste as a new layer on the image.
Place it left at the top - see example.
8.
Activate the poser tube kids4-Egypt1-
edit - copy.
Edit - paste as a new layer on the image.
Place it in the middle at the bottom - see example.
Effects - 3D Effects - drop shadow -
setting is right.
9.
Activate the tube Deco-22 -
edit - copy.
Edit - paste as a new layer on the image.
Place it left at the bottom - see example.
Effects - 3D Effects - drop shadow -
setting is right
10.
Layers - new raster layer - set your watermark into the image.
Layers - merge - merge all visible layers.
File - export - PNG Optimizer.
Ready is the tag
I hope you like this tutorial.
greetings Emmy
Thank you Nelly for testing.