1.
File - open new transparent image 700x700.
Activate the tube achtergrond - edit - copy.
Edit - paste as a new layer on the image.
2.
Activate the tube splatter - edit - copy.
Edit - paste as a new layer on the image.
Activate move tool - place it to the top.
3.
Activate the tube element45 - edit - copy.
Edit - paste as a new layer on the image.
Place it at the bottom - see example.
4.
Activate the tube Nanly_Freebie_32 - edit - copy.
Edit - paste as a new layer on the image.
Place it at the bottom - on the sand - see example.
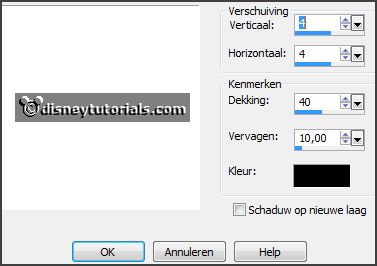
Effects - 3D Effects - drop shadow - with this setting.

5.
Activate the tube element8 - edit - copy.
Edit - paste as a new layer on the image.
Place it on the doors - see example.
Effects - 3D Effects - drop shadow - setting is right.
6.
Activate the tube branch - edit - copy.
Edit - paste as a new layer on the image.
Place it on the stone arch - see example.
Effects - 3D Effects - drop shadow - setting is right.
7.
Activate the tube flower1 - edit - copy.
Edit - paste as a new layer on the image.
Place it on the stone arch - see example.
Effects - 3D Effects - drop shadow - setting is right.
8.
Layers - duplicate.
Image - free rotate - with this setting.

Place it down - see example.
Layers - duplicate.
Place it down - see example.
Layers - merge - merge down and 1 more time.
Layers - arrange - down.
9.
Activate the tube grass - edit - copy.
Edit - paste as a new layer on the image.
Place it right at the bottom - see example.
Effects - 3D Effects - drop shadow - setting is right.
10.
Activate the tube element53 - edit - copy.
Edit - paste as a new layer on the image.
Place it right at the bottom - for the grass - see example.
Effects - 3D Effects - drop shadow - setting is right.
11.
Activate the tube peas - edit - copy.
Edit - paste as a new layer on the image.
Place it left at the top on the stone arch- see example.
Effects - 3D Effects - drop shadow - setting is right.
12.
Activate the tubedeco2 - edit - copy.
Edit - paste as a new layer on the image.
Place it left at the top on the stone arch - see example.
Effects - 3D Effects - drop shadow - setting is right.
13.
Activate the tube flowers - edit - copy.
Edit - paste as a new layer on the image.
Place it left at the bottom- see example.
Effects - 3D Effects - drop shadow - setting is right.
14.
Activate the tube emka_itg_element22 - edit - copy.
Edit - paste as a new layer on the image.
Place it left at the bottom- see example.
Effects - 3D Effects - drop shadow - setting is right.
15.
Activate the poser tube - edit - copy.
Edit - paste as a new layer on the image.
Place it in the middle at the bottom- see example.
Effects - 3D Effects - drop shadow - setting is right.
16.
Activate the tube emka_itg_element110 - edit - copy.
Edit - paste as a new layer on the image.
Place it in the middle at the bottom- see example.
Effects - 3D Effects - drop shadow - setting is right.
17.
Layers - new raster layer - set your watermark into the image.
Layers - merge - merge all visible layers.
File - export - PNG Optimizer.
Ready is the tag
I hope you like this tutorial.
greetings Emmy
Thank you Nelly for testing.