1.
File - open new transparent image 700x700.
Activate the achtergrond - edit - copy.
Edit - paste as a new layer on the image.
2.
Activate the tube Delph_100%happiness el(9) - edit - copy.
Edit - paste as a new layer on the image.
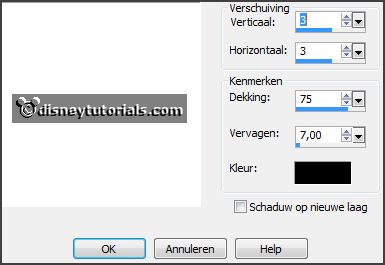
Effects - 3D Effects - drop shadow - with this setting.

3.
Activate the tube Imurph7-charm-ep-leaves - edit - copy.
Edit - paste as a new layer on the image.
Activate move tool - place it right at the top - see example.
Effects - 3D Effects - drop shadow - setting is right.
Layers - arrange - down.
Activate the top layer.
4.
Activate the tube Imurph7-charm-ep-leaf-02 - edit - copy.
Edit - paste as a new layer on the image.
Place it about in the middle at the top - see example.
Effects - 3D Effects - drop shadow - setting is right.
Layers - arrange - down.
Activate the top layer.
5.
Activate the tube Imurph7-charm-ep-redflowertall- edit - copy.
Edit - paste as a new layer on the image.
Place it at the left side.
Effects - 3D Effects - drop shadow - setting is right.
6.
Activate the tube Imurph7-charm-ep-whflowertall- edit - copy.
Edit - paste as a new layer on the image.
Image - free rotate - with this setting.

Place it at the left side.
Effects - 3D Effects - drop shadow - setting is right.
7.
Activate the tube Imurph7-charm-ep-redberry- edit - copy.
Edit - paste as a new layer on the image.
Place it left - right of the redflower - see example.
Effects - 3D Effects - drop shadow - setting is right.
Layers - arrange - down - set it under raster 5.
Layers - duplicate.
Image - free rotate - with this setting.

Layers - arrange - down.
Place it left - see example.
8.
Activate the tube Imurph7-charm-ep-rose- edit - copy.
Edit - paste as a new layer on the image.
Place it left at the bottom.
Effects - 3D Effects - drop shadow - setting is right.
9.
Activate the tube Imurph7-charm-ep-moss- edit - copy.
Edit - paste as a new layer on the image.
Place it in the middle at the bottom.
Effects - 3D Effects - drop shadow - setting is right.
Layers - arrange - down.
10.
Activate the top layer.
Activate the tube Imurph7-charm-ep-berry- edit - copy.
Edit - paste as a new layer on the image.
Place it right at the bottom - see example.
Effects - 3D Effects - drop shadow - setting is right.
Layers - duplicate.
Image - resize 85% - all layers not checked.
Place it right near the other.
11.
Activate the tube Imurph7-charm-ep-bunny- edit - copy.
Edit - paste as a new layer on the image.
Place it in the middle at the bottom - see example.
Effects - 3D Effects - drop shadow - setting is right.
12.
Activate the tube Imurph7-charm-ep-bud- edit - copy.
Edit - paste as a new layer on the image.
Place it right at the bottom - see example.
Effects - 3D Effects - drop shadow - setting is right.
Layers - arrange - down - set it under raster 9.
13.
Activate the poser tube - edit - copy.
Edit - paste as a new layer on the image.
Place it right at the bottom - see example.
Effects - 3D Effects - drop shadow - setting is right.
If it stays good - it stays under raster 9.
14.
Layers - new raster layer - set your watermark into the image.
Layers - merge - merge all visible layers.
File - export - PNG Optimizer.
Ready is the tag
I hope you like this tutorial.
greetings Emmy
Thank you Nelly for testing.