1.
File - open new transparent image
700x700.
Activate the tube achtergrond steen -
edit - copy.
Edit - paste as a new layer on the image.
Activate move tool - place it left.
Layers - duplicate.
Image - mirror.
Layers - merge - merge down.
2.
Activate the tube BS28--pizarra -
edit - copy.
Edit - paste as a new layer on the image.
Place it a little up and to the right.
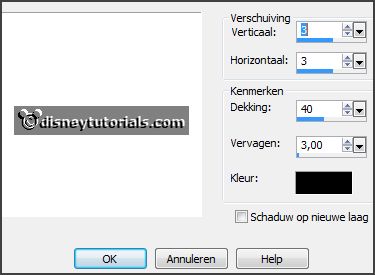
Effects - 3D Effects - drop shadow - with this setting.

3.
Activate the tube Chalk_Girl -
edit - copy.
Edit - paste as a new layer on the image.
Place it right on the blackboard - see example.
4.
Activate the tube Chalk_Boy -
edit - copy.
Edit - paste as a new layer on the image.
Place it left on the blackboard -
see example.
5.
Activate the tube Chalk_ABC -
edit - copy.
Edit - paste as a new layer on the image.
Place it left at the top of the blackboard -
see example.
6.
Activate the tube RR_BackToScool_Element(10) -
edit - copy.
Edit - paste as a new layer on the image.
Place it right at the top of the blackboard -
see example.
7.
Activate the tube BS28--Hojas -
edit - copy.
Edit - paste as a new layer on the image.
Place it left at the top.
Effects - 3D Effects - drop shadow - setting is right.
8.
Activate the tube BS28--Flor2 -
edit - copy.
Edit - paste as a new layer on the image.
Place it left at the top -
see example.
Effects - 3D Effects - drop shadow - setting is right.
9.
Activate the tube BS28--Rama -
edit - copy.
Edit - paste as a new layer on the image.
Place it left at the top -
see example.
Effects - 3D Effects - drop shadow - setting is right.
10.
Activate the tube BS28--Pupitre -
edit - copy.
Edit - paste as a new layer on the image.
Place it left at the bottom -
see example.
Effects - 3D Effects - drop shadow - setting is right.
11.
Activate the tube BS28--Manzana -
edit - copy.
Edit - paste as a new layer on the image.
Place it left on the desk -
see example.
Effects - 3D Effects - drop shadow - setting is right.
12.
Activate the tube BS28--Cartera -
edit - copy.
Edit - paste as a new layer on the image.
Place it left at the bottom -
see example.
Effects - 3D Effects - drop shadow - setting is right.
13.
Activate the tube BS28--Papel -
edit - copy.
Edit - paste as a new layer on the image.
Place it left at the bottom -
see example.
Effects - 3D Effects - drop shadow - setting is right.
14.
Activate the poser tube -
edit - copy.
Edit - paste as a new layer on the image.
Place it in the middle at the bottom -
see example.
Effects - 3D Effects - drop shadow - setting is right.
15.
Activate the tube TimeToSchool_IMC_el(32)-
edit - copy.
Edit - paste as a new layer on the image.
Place it right under the blackboard -
see example.
Effects - 3D Effects - drop shadow - setting is right.
16.
Activate the tube BS28--Escuadra -
edit - copy.
Edit - paste as a new layer on the image.
Place it left at the globe -
see example.
Effects - 3D Effects - drop shadow - setting is right.
17.
Activate the tube BS28--Libros2 -
edit - copy.
Edit - paste as a new layer on the image.
Place it left under the globe -
see example.
Effects - 3D Effects - drop shadow - setting is right.
18.
Activate the tube BS28--Sacapuntas -
edit - copy.
Edit - paste as a new layer on the image.
Place it under the books -
see example.
Effects - 3D Effects - drop shadow - setting is right.
19.
Activate the tube RR_BackToSchool_Element(41)-
edit - copy.
Edit - paste as a new layer on the image.
Place it right under the blackboard -
see example.
Effects - 3D Effects - drop shadow - setting is right.
20.
Layers - new raster layer - set your watermark into the image.
Layers - merge - merge all visible layers.
File - export - PNG Optimizer.
Ready is the tag
I hope you like this tutorial.
greetings Emmy
Thank you Nelly for testing.