1.
File - open new transparent image 700x700.
Set the foreground color to #dac6f2.
Activate the tube Emmyraster -
edit - copy.
Edit - paste as a new layer on the image.
Activate move tool - set it a little up.
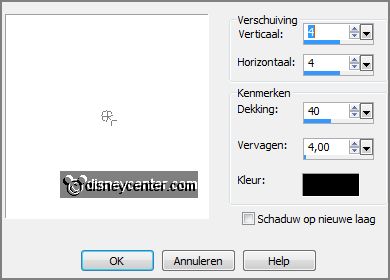
Effects - 3D Effects - drop shadow - with this setting.

2.
Activate the tube bee_lilacssent_el42 -
edit - copy.
Edit - paste as a new layer on the image.
Effects - 3D Effects - drop shadow - setting is right.
3.
Activate the magic wand - select in the middle of the frame.
Selections - modify - expand 5 pixels.
Layers - new raster layer.
Fill the selection with the foreground color.
Selections - select none.
Layers - arrange move down.
Activate the top layer.
4.
Activate the tube bee_lilacssent_el56 -
edit - copy.
Edit - paste as a new layer on the image.
Layers - arrange - move down.
Effects - 3D Effects - drop shadow - setting is right.
5.
Activate the tube fairytubes10 -
edit - copy.
Edit - paste as a new layer on the image.
Move a little down.
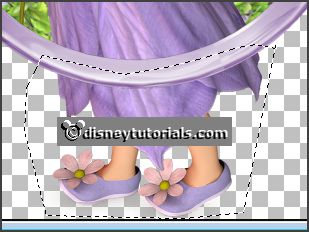
Activate free hand selection tool - from point tot point - and make a selection -
as below - click at the delete key.

Selections - select none.
6.
Layers - duplicate.
Layers - arrange - move up - and one more time.
Activate the eraser and erase the part what's up the frame and the leave -
see example.
Effects - 3D Effects - drop shadow - setting is right.
7.
Activate the tube bee_lilacssent_el69 -
edit - copy.
Edit - paste as a new layer on the image.
Image - mirror.
Place ir at the right side -
see example.
Effects - 3D Effects - drop shadow - setting is right.
8.
Activate the tube bee_lilacssent_el54 -
edit - copy.
Edit - paste as a new layer on the image.
Image - mirror.
Place it right -
see example.
Effects - 3D Effects - drop shadow - setting is right.
9.
Activate the tube bee_lilacssent_el105 - edit - copy.
Edit - paste as a new layer on the image.
Place it on the
stems of the flowers -
see example.
Effects - 3D Effects - drop shadow - setting is right.
10.
Activate the tube bee_lilacssent_el8 -
edit - copy.
Edit - paste as a new layer on the image.
Place it on the bird cage -
see example.
Effects - 3D Effects - drop shadow - setting is right.
11.
Activate the tube bee_lilacssent_el48 -
edit - copy.
Edit - paste as a new layer on the image.
Place it left under the bird cage -
see example.
Effects - 3D Effects - drop shadow - setting is right.
Erase the stem.
12.
Activate the tube bee_lilacssent_el39 -
edit - copy.
Edit - paste as a new layer on the image.
Place it left at the bottom -
see example.
Effects - 3D Effects - drop shadow - setting is right.
13.
Activate the tube bee_lilacssent_el33 -
edit - copy.
Edit - paste as a new layer on the image.
Place it near the flowers -
see example.
Effects - 3D Effects - drop shadow - setting is right.
Layers - arrange - move down.
Activate the top layer.
14.
Activate the tube bee_lilacssent_el29 -
edit - copy.
Edit - paste as a new layer on the image.
Effects - 3D Effects - drop shadow - setting is right.
Effects - 3D Effects - drop shadow - setting is right.
15.
Activate the tube bee_lilacssent_el15 -
edit - copy.
Edit - paste as a new layer on the image.
Image - mirror.
Place it on the bucket and lilac -
see example.
Effects - 3D Effects - drop shadow - setting is right.
Image - duplicate.
Image - free rotate - with this setting.

Place it as in
the example.
16.
Activate the tube bee_lilacssent_el2 -
edit - copy.
Edit - paste as a new layer on the image.
Image - free rotate - with this setting.

Place it on the bucket and the twigs -
see example.
Effects - 3D Effects - drop shadow - setting is right.
17.
Layers - new raster layer - set your watermark into the image.
Layers - merge - merge all visible layers.
File - export - PNG Optimizer.
Ready is the tag
I hope you like this tutorial.
greetings Emmy
Thank you Nelly for testing.