Before you begins.......
Plug-ins : Install first your plug-ins before you open PSP and put
them in the folder plug-ins.
Put the gold
pattern in the folder patterns.
Open your tubes PSP.
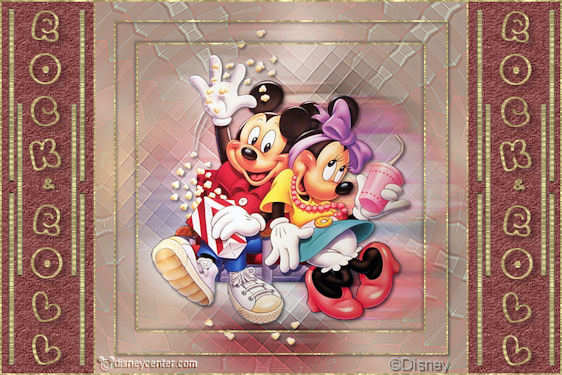
Rock & Roll
Foreground color #e4dac1 and background color on gold pattern.
1
Open new transparent image 500x500.
Fill this with the foreground color.
Copy Mickey and Friends18 and paste as a new layer.
2.
Adjust - blur - Gaussiaans blur - radius 20.
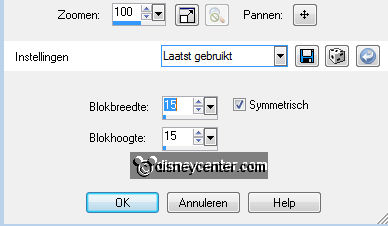
Effects - Distortion Effects - Pixelate with this setting.
Effects - Edge Effects - Enhance more.
3.
Duplicate this layer - Stay at raster 2.
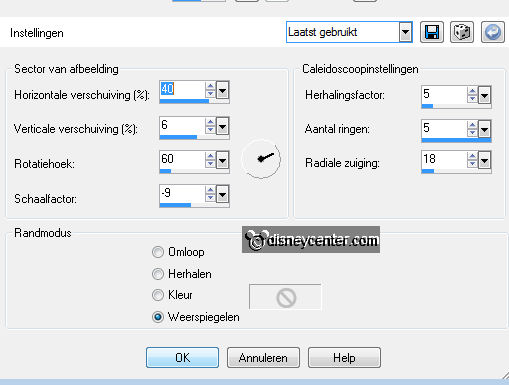
Effects - Reflection effects - Kaleidoscope with this setting.
Set the opacity of this layer at 50.
4.
Stay at the top layer - Image - Resize 125% - all layers not checked.
Image - free rotate - right 41.
Copy Mickey and Friends18 and paste as a new layer.
Duplicate this layer.
5.
Stay at raster 3 - Effects - Distortion Effects - wind left 100.
Repeat the wind, but now right 100.
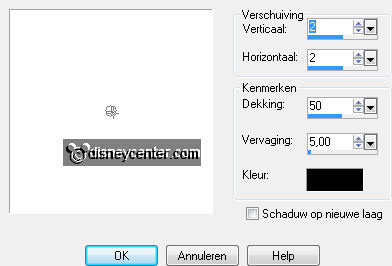
Stay at the top layer - Effects - 3D Effects - drop shadow with this setting.
6.
New raster layer - fill this with gold pattern.
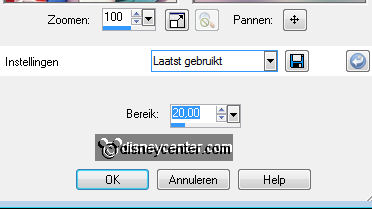
Selections - select all - selections - modify - contract 2
Click at the delete key.
Give the same drop shadow as in point 5.
7.
Selections - select all - selections - modify - contract 27
New raster layer - fill this with gold pattern.
selections - modify - contract 2
Click at the delete key.
Give the same drop shadow as in point 5.
8.
Selections - select all - selections - modify - contract 57
New raster layer - fill this with gold pattern.
selections - modify - contract 2
Click at the delete key.
Give the same drop shadow as in point 5.
Layers - merge - merge all.
9.
Open new transparent image 750x500.
Fill this with #864443.
New raster layer - fill this with gold pattern.
Selections - select all -
selections - modify - contract 2
Click at the delete key.
Selections - select none.
10.
Copy the other image and paste as a new layer.
Place this in the middle.
Stay at the bottom layer - Select the red/brown squares.
11.
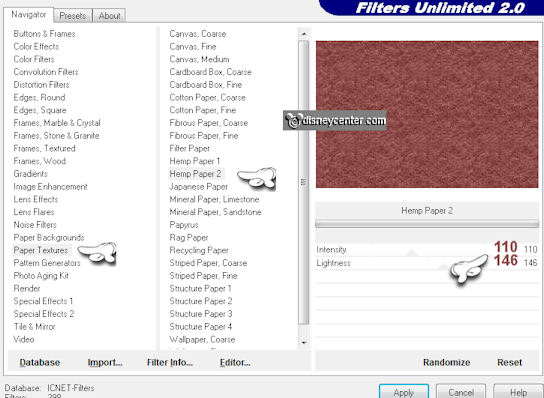
Effects - Filter Unlimited2.0 - Paper Textures - Hemp paper2 with this setting.
Effects - FM Tile Tools - Blend Emboss default setting.
Selections - select none.
12.
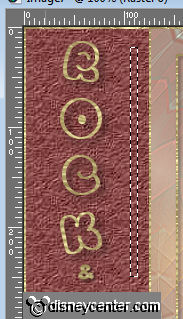
Go to text tool - foreground closed - background on gold pattern.

Font Tourist Trap - size 48 and write vertical Rock & Roll.
For the & I use the font Arial.
Give the same drop shadow as in point 5.
13.
Go to selection tool - rounded rectangle - and pull a vertical small stripe.
New raster layer - fill this with gold pattern.
Effects - 3D Effects - as button with this setting.

14.
Place this about 13 pixels of the top.
Duplicate this layer - Image - Flip.
Duplicate one more time - place this in the middle near the other2, see example.
15.
Layers - merge - merge down - and once more.
Duplicate this layer - Image - mirror.
I have them 2 more times duplicated and put them on the other side.
16.
New raster layer - put your watermark into the image.
Layers - merge all.
Image - Resize 75% - all layers checked.
17.
File - export- JPEG optimizer.
Ready is the tag
I hope you like this tutorial.
greetings Emmy

Tutorial written
14-07-2011