Alien Skin Eye Candy 5 - Impact -
Gradient Glow, Eye Candy 4000 -
Gradient Glow,
Download
here
Before you begins.......
Plug-ins: Install first your plug-ins before you open PSP and put
them in the folder plug-ins.
Put the preset shape in the folder preset shapes.
Open your tube and template in PSP.
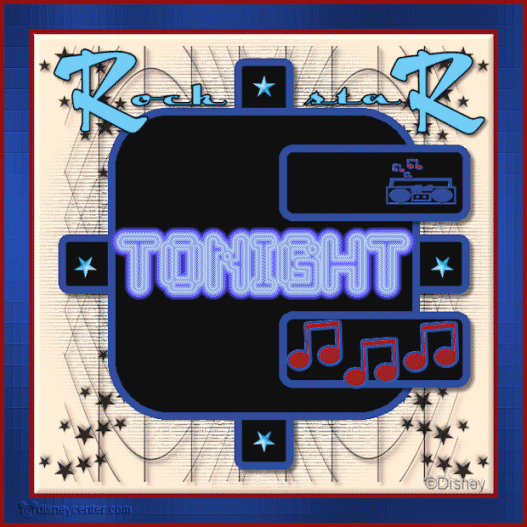
RockStar
Foreground color #20408f and background color #961010
1.
Open new transparent image 600x600.
Fill this with #f6dec6.
Open the template RockStar.
Copy lijnen and paste as a new layer.
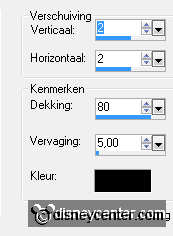
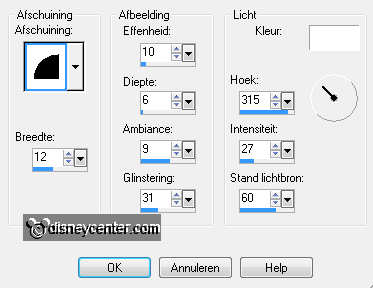
Effects - 3D Effects - drop shadow with this setting.
2.
Copy masker and paste as a new layer.
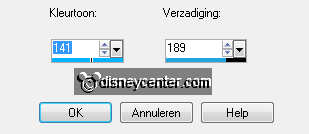
Adjust - Hue and Saturation - colorize - with this setting.
Copy doodle and paste as a new layer.
Layers - merge - merge down - and one more time.
3.
Copy - horz.balk and paste as a new layer.
Copy - rand horz.balk and paste as a new layer.
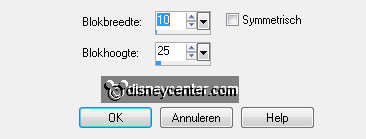
Select the border - fill with foreground color.
Selections - select none.
Layers - merge - merge down
Give the same drop shadow as in point 1.
4.
Copy vert.balk and paste as a new layer.
Copy rand vert.balk and paste as a new layer.
Select the border - fill with foreground color.
Selections - select none.
Layers - merge - merge down
Give the same drop shadow as in point 1.
Layers - merge - merge down
5.
Copy sterretjes and paste as a new layer.
Adjust - Hue and Saturation - colorize - with the same setting as in point 2.
Layers - merge - merge down
6.
Copy vierkant and paste as a new layer.
Copy rand vierkant and paste as a new layer.
Select the border - fill with foreground color.
Selections - select none.
Layers - merge - merge down
7.
Copy wordart and paste as a new layer.
Adjust - Hue and Saturation - colorize - with the same setting as in point 2.
Place this at the top - see example.
8
Copy kleine rechthoek and paste as a new layer. (you don't see it, but it will
come)
Copy rand kleine rechthoek and paste as a new layer.
Select the borders - fill with foreground color.
Selections - select none.
Layers - merge - merge down
Place them right. see example.
Give the same drop shadow as in point 1.
9
Go to preset shape tool - look for rock star-e - set width at 4 - anti-alias and
create as vector checked.
Pull this at the bottom rectangle left - convert to raster layer. see example.
Effects - FM Tile Tools - Blend Emboss - default setting.
Duplicate this layer 2 times and place as example.
Layers - merge - merge down - and one more time.
10
Go again to preset shape tool - and look for Rock star-J - set width at 2 -
anti-alias and create as vector checked.
Pull this at the top rectangle right - convert to raster layer. see
example.
Effects - FM Tile Tools - Blend Emboss - default setting.
Place this right.
Layers - merge - merge down - and one more time.
11
Image - add border 5 - background color.
Layers - Promote background layer.
Image - resize 90% - all layers not checked.
New raster layer - select the transparent layer.
Fill this with the foreground color.
12.
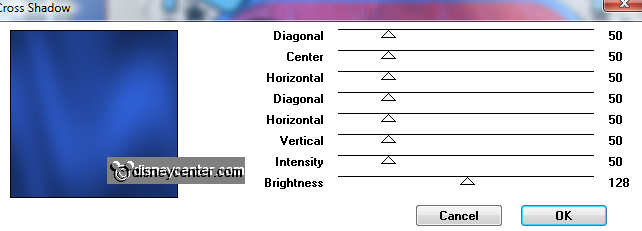
Effects - Graphics Plus - Cross Shadow - with this setting.
Selections - select none.
Effects - Distortion Effects - Pixelate - with this setting.
Effects - Edge Effects - enhance more.
13.
Stay at the bottom layer.
Effects - 3D Effects - Inner Bevel - with this setting.
Make the top layer active.
Layers - merge - merge down
14.
Image - add border 5 - background color.
Selections - select all - selections - modify - contract 5.
Selections - invert - Layers - promote selection to layer.
Selections - select none.
15.
Image - resize 89% - all layers not checked.
Now the border away from the enhance.
Layers - merge - merge down
16.
Copy word-art Tonight - and paste as a new layer. (Stays at the right place)
Duplicate this layer 5 times.
Lock the duplicated layers and make the original layer active.
17.
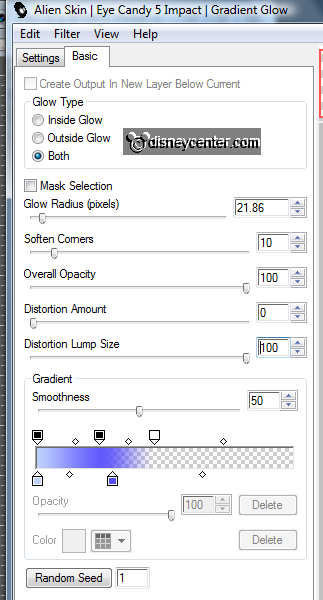
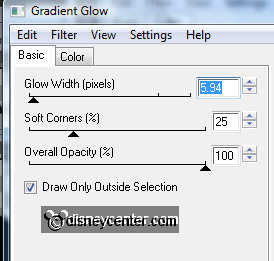
Effects - Alien Skin Eye Candy 5 - Impact - Gradient Glow - with this setting.
Lock this layer and open the next - make this active.
Repeat the Gradient Glow, but now click at Random Seed.
Lock this layer and open the next - make this active.
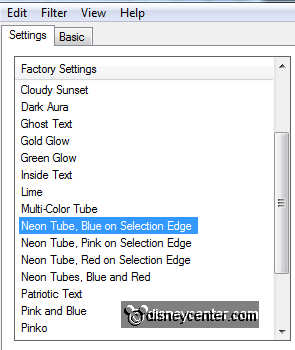
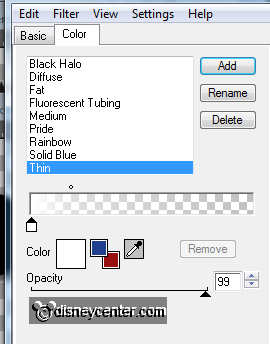
Repeat the Gradient Glow, now at settings click the Neon Tube Pink.
Lock this layer and open the next - make this active.
Repeat the Gradient Glow, but now click at Random Seed.
Lock this layer and open the next - make this active.
Repeat the Gradient Glow, now at settings click the Neon Tube Red.
Lock this layer and open the next - make this active.
Repeat the Gradient Glow, but now click at Random Seed.
18.
Make the top layer active.
Copy Mickey Rockstar and paste as a new layer.
Place this left at the bottom.
Effects - Eye Candy 4000 - Gradient Glow - with this setting.
New raster layer - put your watermark into the image.
19.
Lock all layers, except the top 2.
Edit - copy merged.
Open Animation shop - paste as a new animation.
Back in PSP - lock raster 1 and open copy of raster 1.
Edit - copy merged.
Back in AS - paste after active frame - make sure the last frame is always
selected.
Back in PSP - lock copy of raster 1 and open copy(2) of raster 1.
Edit - copy merged.
Back in AS - paste after active frame
Back in PSP - lock copy(2) of raster 1 and open copy(3) of raster 1.
Edit - copy merged.
Back in AS - paste after active frame
Back in PSP - lock copy(3) of raster 1 and open copy(4) of raster 1.
Edit - copy merged.
Back in AS - paste after active frame
Back in PSP - lock copy(4) of raster 1 and open copy(5) of raster 1.
Edit - copy merged.
Back in AS - paste after active frame
Back in PSP - lock copy(5) of raster 1 and open raster 2.
Edit - copy merged.
Back in AS - paste after active frame
20.
Edit - select all - Animation - Properties of frames at 20.
Change the last frame in 75.
Animation - resize 85%.
File - save as - give name - click 3 times at next and than at finish.
Ready is the tag
I hope you like this tutorial.
greetings Emmy

Tutorial written
10-08-2011
