
This
Tutorial is copyrighted to the Tutorial Writer, © Emmy Kruyswijk 2010.
This Tutorial
may
not be forwarded, shared or otherwise placed on any Web Site or group without written
permission from
Emmy Kruyswijk
Do you want to link my lessons?
Please send
me a mail.
Materials:
4 tubes, font Monotype Corsiva, 2
preset shapes
filters: Penta.com - Dot and Cross, Xero -Tekstya, Funhouse
- Xaggerate,
Materials
download hier
Put the plug-ins in the folder plug-ins. Put the preset shapes in
the folder preset shapes.
Snow-White
1.
Open a new transparent image 600x400.
Set the foreground color to #fbff7f and the background color to #c3dbf3.
Make from the foreground a gradient linear.
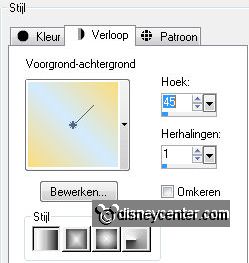
Fill this layer with the gradient.
2.
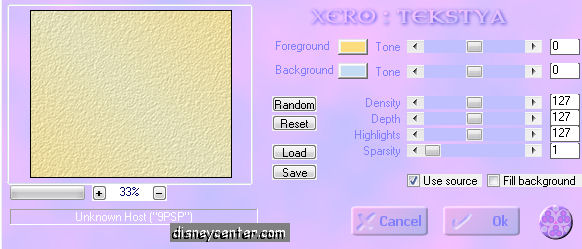
Effects – plug-ins – Xero – Tekstya – with this setting.
Set the foreground back to color and the background
color to #c5681a.
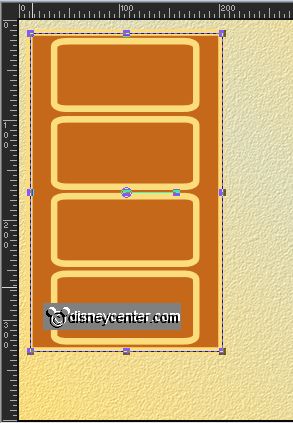
Activate preset shape tool and look for vfilm and make a rectangle
down, see below.

Convert to raster layer.
Place this left - see below.
Click with the magic wand in the 4
squares of the rectangle - click at the delete key.
Selections - select none.
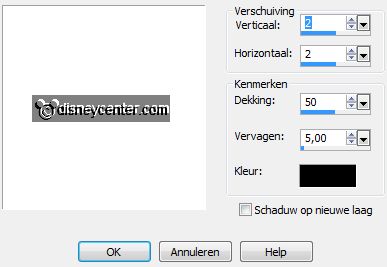
Effects - 3D Effects - drop shadow - with this setting.
4.
Select with the magic wand the brown color.
Effects – plug-ins - Penta.com - Dot and Cross
72-10-2.
Selections - select none.
5.
Activate the tube Snowwhite – layer tube - edit - copy.
Edit – paste as a new layer on the image.
Image - resize 75% - all layers not checked.
Layers - arrange - move down.
Place this as the example.
6.
Be sure you stay at the tube layer.
Activate eraser tool, put this on 20.
Erase all from the tube of Snowwhite, outside the preset shape. Also
below.
7.
Activate preset shape tool and look for vierkant...schaduw.
Setting is right.
Convert to raster layer.
Place this in the middle – see example.
8.
Select with the magic wand the brown color.
Effects – plug-ins - Penta.com - Dot and Cross – setting is right.
Selections - select none.
Effects - 3D Effects - drop shadow – setting is right.
9.
Activate the top layer.
Activate the Bashful tube – edit - copy.
Edit – paste as a new layer on the image..
Image - resize 75% - all layers not checked.
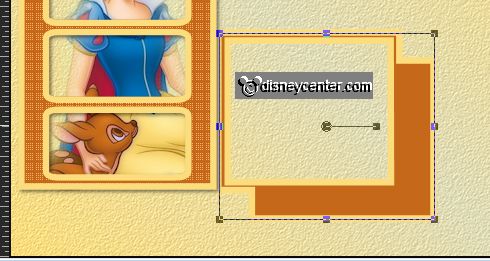
Place this at the preset shape - see example.
10.
Duplicate this layer.
Lock the duplicated layer.
Stay at the original layer.
Effects – plug-ins - Funhouse - Xaggerate 24-24
Open the duplicated layer and set the opacity of this layer to 55.
Layers – merge – merge down.
Effects –3 D Effects – drop shadow – setting is right.
11.
Activate the tube vogel – edit - copy.
Edit – paste as a new layer on the image.
Place this in the middle at the top – see example.
Effects – 3 D Effects – drop shadow – setting is right.
12.
Layers – duplicate.
Image – mirror.
Place this at the preset shape of bashful – see below.
13.
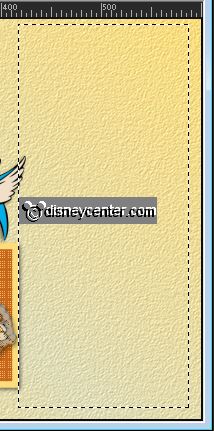
Activate selection tool - selection - rectangle and make a rectangle
as below.
Layers – new raster layer.
Fill the selection with the foreground color.
Selections – modify – contract 7 pixels.
14.
Layers – new raster layer.
Fill the selection with the background color.
Effects – plug-ins - Penta.com - Dot and Cross – setting is right.
Layers – merge – merge down.
Effects – 3 D Effects – drop shadow – setting is right.
Repeat the drop shadow – now with vert. and horz. to -2.
15.
Activate the tube snowwhite1 – edit - copy.
Edit – paste as a new layer on the image.
Image - resize 83% - all layers not checked.
Place this at the rectangle – see example.
Effects – 3 D Effects – drop shadow – with this setting.
16.
Turn the colors.
Activate text tool – with this setting.

Write Snow-White – convert to raster layer.
Place this left below.
Effects – 3 D Effects – drop shadow – setting is right.
17.
Turn the colors again.
Image – add borders 7 pixels – symmetric – foreground color.
Image – add borders 30 pixels – symmetric – background color.
Image – add borders 7 pixels – symmetric – foreground color.
18.
Select with the magic wand the brown color.
Effects – plug-ins – Penta.com – Dot and Cross - setting is right.
Selections - select all.
19.
Selections - modify - contract 44.
Selections - invert.
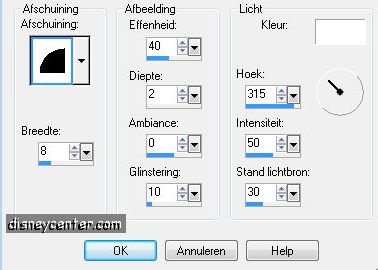
Effects – 3D Effects – Inner Bevel – with this setting.
Selections - select none.
20.
Layers – new raster layer – put your watermark into the image.
Layers – merge – merge all layers.
File – save as JPEG.
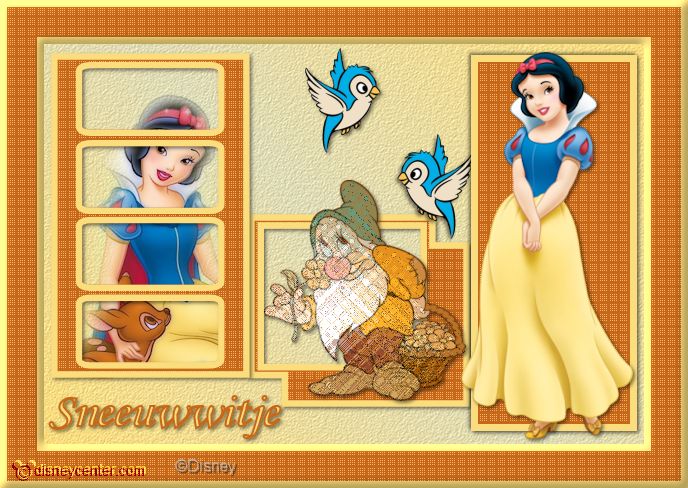
Ready is the tag
I hope you like this tutorial.
greetings Emmy,
Tutorial written
24-10-2009