Before you begins.......
Plug-ins : Install first your plug-ins before you open PSP and put
them in the folder plug-ins.
Put the preset shape in the folder
preset shapes.
Open your tubes in PSP.
Snow-white and Fun
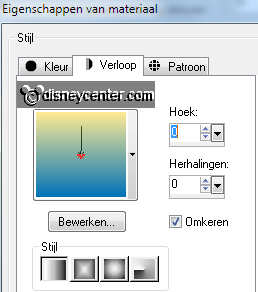
Foreground color #feea93 and background color #0072b8
1.
Open new transparent image 850x600.
Fill this with gradient linear.
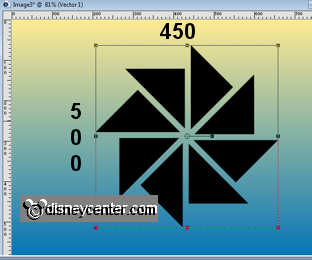
Go to Preset Shape tool and look for DE69.
 .
.
Pull a preset shape of 450x500. - convert to raster layer.
2.
Select the black squares - fill this with the foreground color.
Duplicate this layer 2 more times.
Fill the copy of raster 2 with the background color.
Selections - select none.
3.
Stay at the copy layer (background color).
Image - Resize 75% - all layers not checked.
Stay at the copy(2) layer - image - resize 50% - all layers not checked.
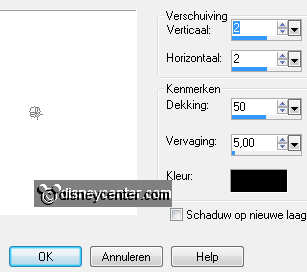
Effects - 3D Effects - drop shadow with this setting. All 3 de layers.
Layers - merge - merge down - and once more.
4.
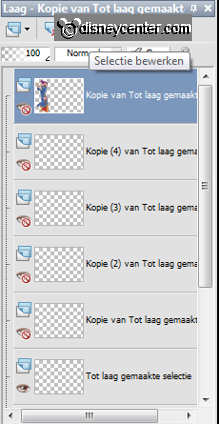
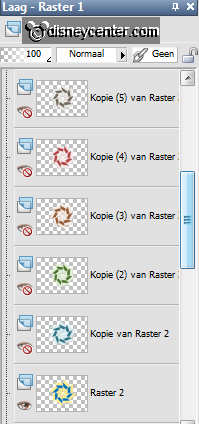
Duplicate this layer 5 times.
Stay at the copy layer - adjust - Hue and Saturation - colorize- Hue 136 -
Saturation 118.
Stay at the copy(2) layer - adjust - Hue and Saturation - colorize- Hue 66 -
Saturation 109.
Stay at the copy(3) layer - adjust - Hue and Saturation - colorize- Hue 18 -
Saturation 118.
Stay at the copy(4) layer - adjust - Hue and Saturation - colorize- Hue 0 -
Saturation 118.
Stay at the copy(5) layer - adjust - Hue and Saturation - colorize- Hue 26 -
Saturation 28.
I have the first preset shape and last preset shape reversed, so
blue-yellow as copy (5) and the gray-white as raster 2.
If you do this you must also change the name.
5.
Stay again at the copy layer - image - free rotate - right 25.00.

Stay at the copy(2) layer - image - free rotate - right 50.00.
Stay at the copy(3) layer - image - free rotate - right 75.00.
Stay at the copy(4) layer - image - free rotate - right 100.00.
Stay at the copy(5) layer - image - free rotate - right 125.00.
6.
Copy Tby T_DisneyBirds and paste as a new layer.
Place this in the middle at the preset shape.
Give the same drop shadow as in point 3.
7.
Copy SnowWhite Disney-mar and paste as a new layer.
Place this at the bottom right.
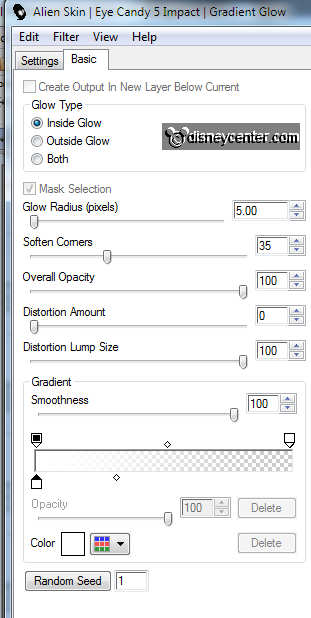
Effects - Alien Skin - Eye Candy 5 - Impact - Gradient Glow with this setting.
Give the same drop shadow as in point 3.
8.
Copy SnowWhite fun (text) and paste as a new layer.
Place this in the right upper corner. see example.
9.
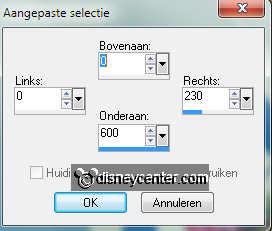
Go to selection tool - custom selection with this setting.
New raster layer - fill this with the background color.
Selections - modify - contract 5
New raster layer - fill this with the gradient from point 1, but now invert
checked.
10.
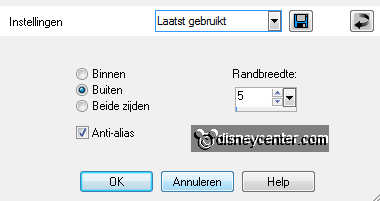
Selections - modify - select selection borders with this setting.
Effects - 3D Effects - drop shadow - same as point 3.
Repeat the drop shadow, but now vert. and horz. at -2.
Selections - select none.
11.
Open the tube jcw-sneezy_dopey - shift D - close the original tube.
Select all transparent parts next to the tube.
Selections - invert - Copy and paste as a new layer.
Place this in the custom selection.
Duplicate this layer - Stay at the duplicate layer.
selections - select none - lock the duplicate layer.
Stay at the other layer - click at the delete key. Let selection stay.
Effects - Alien Skin - Eye Candy 5 - Impact - Gradient Glow same setting as
point 7.
Selections - select none - Duplicate this layer 4 times.
12.
Set the opacity of the glow layers at 5, second at 24, third at 43, fourth
at 62, fifth at 81.
Open now the duplicated tube layers.
Effects -same Alien Skin Glow Gradient as the other layers.
Give the same drop shadow as in point 3.
13.
Copy Thumper and paste as a new layer - place this at the bottom. see
example.
Effects - Alien Skin - Eye Candy 5 - Impact - Gradient Glow same as point 7.
Give the same drop shadow as in point 3.
14.
Image - Resize 75% - all layers checked.
New raster layer - put your watermark into the image.
Selections - select all - modify - contract 2.
Selections - invert - fill with black.
Selections - select none.
15.
Lock now the layers below.
Stay at the bottom layer - edit - copy merged.
Open animation shop - paste as a new animation.
16.
Lock raster 2 and 9 and open copy raster 2 and 9 - edit - copy merged.
Back in animation shop - paste after current frame - make sure the last frame is
always selected.
Back in PSP - Lock copy raster 2 and 9 and open copy(2) raster 2 and 9 - edit -
copy merged.
Back in animation shop - paste after current frame.
Back in PSP - Lock copy(2) raster 2 and 9 and open copy(3) raster 2 and 9 - edit
- copy merged.
Back in animation shop - paste after current frame.
Back in PSP - Lock copy(3) raster 2 and 9 and open copy(4) raster 2 and 9 - edit
- copy merged.
Back in animation shop - paste after current frame.
Back in PSP - Lock copy(4) raster 2 and 9 and open copy(5) raster 2 and 6 - edit
- copy merged.
Back in animation shop - paste after current frame.
17.
Select the last frame - animation - Frames properties - at 100.
File- save as - dive name - click 3 times at next and than finish.
Ready is the tag
I hope you like this tutorial.
greetings Emmy

Tutorial written
14-07-2011