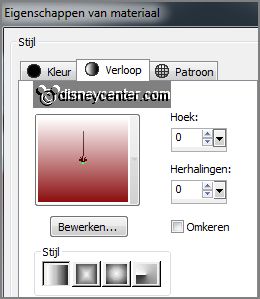
2.
Activate flood fill tool and fill the layer with the gradient.
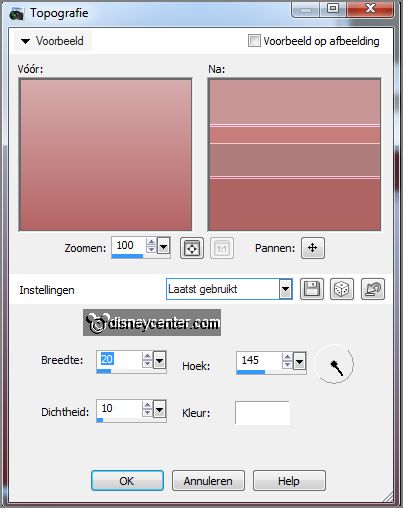
Effects - Artistic Effects - Topography -
with this setting.
3.
Layers - duplicate.
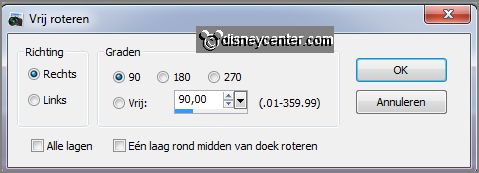
Image - free rotate -
with this setting.
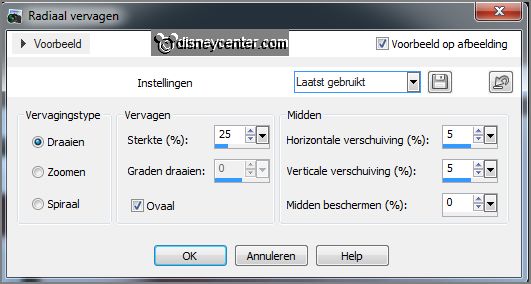
Adjust - blur - radial blur -
with this setting.
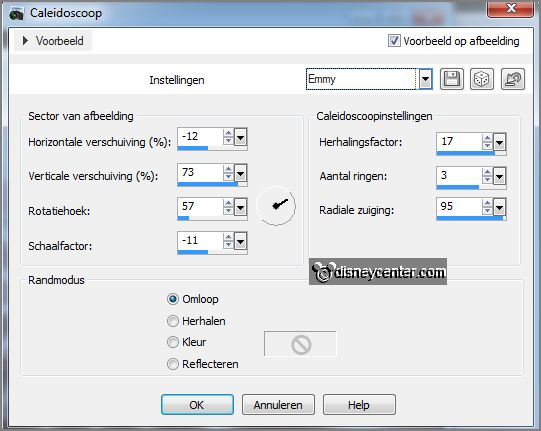
Effects - Reflection -effects - Kaleidoscope - click on settings - Emmy.
4.
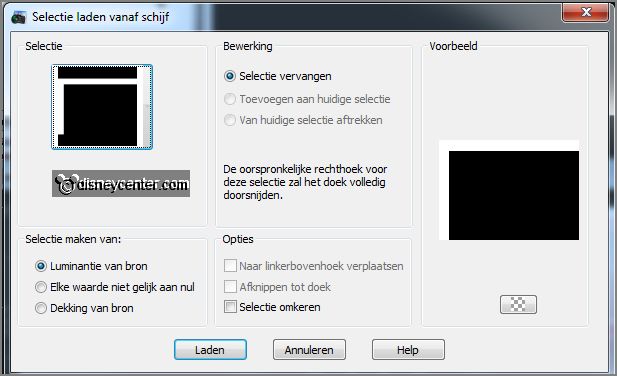
Selection - load/save selection - load selection from disk - look -
Emmysoldaatjes - with this setting.
Layers - new raster layer.
5.
Fill the selection with the foreground color.
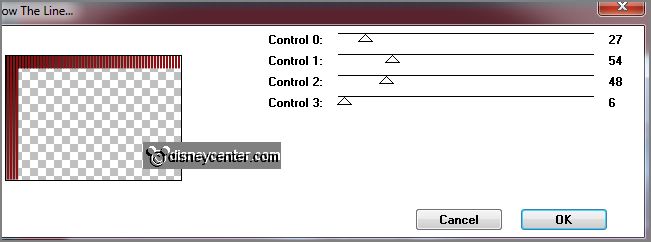
Effects - plug-ins - Tramages - Tow the Line -
with this setting.
6.
In the layer palette - Promote selection to layer.
Selections - select none.
Image - mirror - image - flip.
Layers - merge - merge down.
Image - resize 85% - all layers not checked.
7.
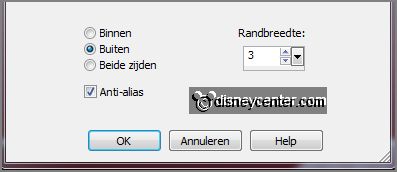
Activate the magic wand - with setting below - select inside the frame.

Selections - modify - expand 2 pixels.
Make copy of raster 1 active - click at the delete key.
8.
Make raster 1 active. (Selection is still there)
Layers - new raster layer.
Edit - cut - edit - paste in selection.
Adjust - blur - Gaussian blur - radius 25.
9.
Make raster 2 active.
Selections - select all - selection - float.
Selections - modify - select selected borders -
with this setting.
Set in the material palette the background back to
color white.
10.
Layers - new raster layer.
Fill the selection with the background color. (both selections)
Selections - select none.
Layers - merge - merge down.
11.
Make raster 1 active.
Effects - plug-ins - FM Tile Tools - Blend Emboss - default setting - click OK.
12.
Make raster 2 active.
Effects - 3D Effects - drop shadow -
with this setting.
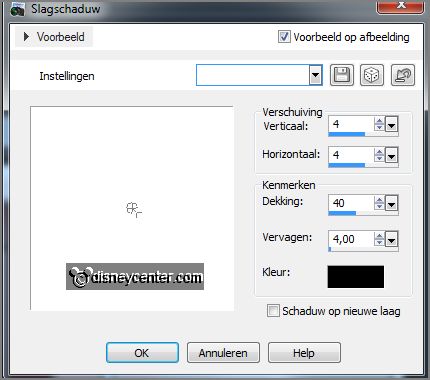
Repeat the drop shadow - now with vert. and horz. at -4
13.
Selections - select all.
New raster layer
Fill the layer with the background color.
Selections - modify - contract 3 pixels - click at the delete key.
Selections - select none.
14.
Activate the tube knabbelkerst - edit - copy.
Edit - paste as a new layer on the image.
Activate move tool - put the tube to the left side - see example.
Effects - 3D Effects - drop shadow - with this setting.
15.
Activate the tube kado - edit - copy.
Edit - paste as a new layer on the image.
Put the tube to the left side for Chip.
Effects - 3D Effects - drop shadow - setting is right.
16.
Activate text tool - font Arial Black - size 72 - stroke width 2 -
write Soldiers.
Convert to raster layer.
17.
Activate selection tool.
Pull the text down - see below.
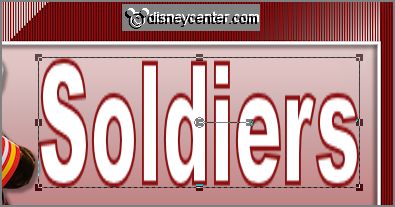
Put selection tool back to move tool.
Set in the layer palette the opacity of this layer to 10. Move the text to the
top in the right corner of the gradient rechtangle.
18.
Activate the tube soldaatje- image - resize 75% - all layers checked.
Edit - copy - edit - paste as a new layer on the image.
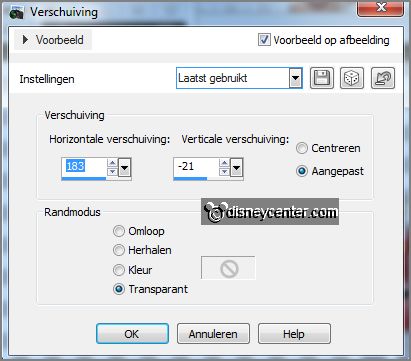
Effects - Image effects - offset -
with this setting.
19.
Layers - duplicate.
Put the tube with the arms against the other at the left side.
20.
Layers - duplicate.
Put the tube with the arms against the other at the left side.
Layers - merge - merge down - one more time.
21.
Effects - plug-ins - Alien Skin Eye Candy - Impact - Gradient Glow - click at Settings -
User Setting - click at Emmysoldaatjes - click OK.
Lock in the layer palette this tube layer soldaatje.
22.
Make the bottom layer active.
Layers - merge - merge all visible layers.
Edit - copy.
23.
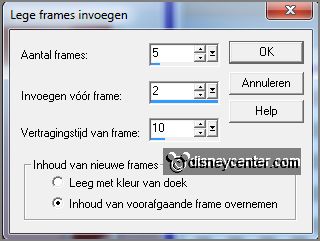
Open Animation Shop - edit - paste as a new animation.
Animation - Insert frames - Empty Frames -
with this setting.
24.
Open animation soldaatjes - edit - select all.
Edit - copy.
Edit - paste in selected frames of the image.
25.
Edit - select all.
Animation - Reverse frames.
26.
Back to PSP - open the tube layer soldaatjes.
Edit - copy merged.
In AS - edit - paste after active frame.
27.
Edit - select all.
Animation - Frame Properties at 20 - set the last frame at 150.