1.
File- open new transparent image 700x500.
Set in the material palette the foreground
color at black and the background color
at
#b1a594.
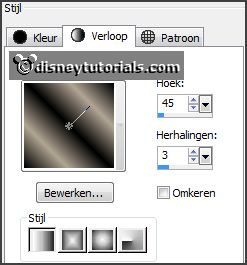
Make from the foreground a gradient linear -
with this setting.
Activate flood fill tool - fill the layer with
the background color.
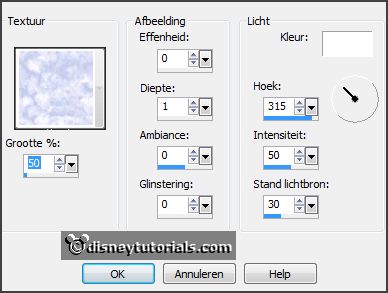
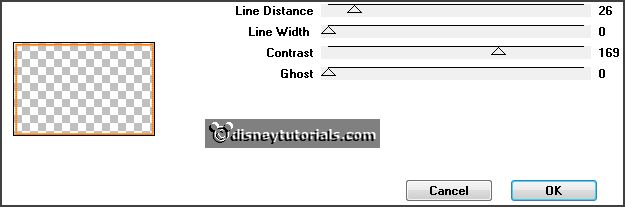
Effects - Texture effects - Texture - look ss032 -
with this setting.
2.
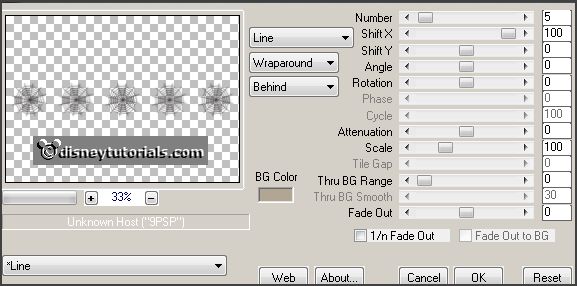
Activate the tube spiderweb - edit - copy.
Edit - paste as a new layer on the image.
Effects - plug-ins - MuRa's Meister - Copies -
with this setting - click
OK.
Objects - Align - up.
3.
Layers - duplicated.
Objects - Align - under.
Layers - merge - merge down.
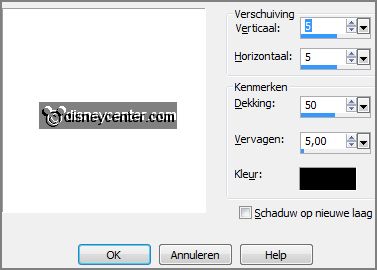
Effects - 3D Effects - drop shadow - with this
setting.
4.
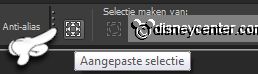
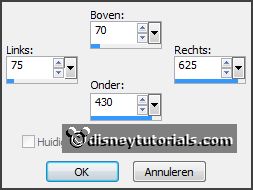
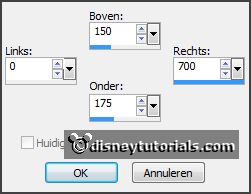
Activate selection tool - custom selection -
with this setting.
Layers - new raster layer.
Fill the selection with the gradient.
Adjust - blur - Gaussian blur - radius 35.
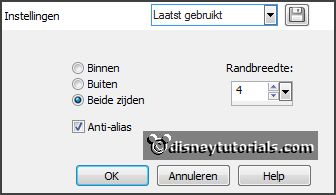
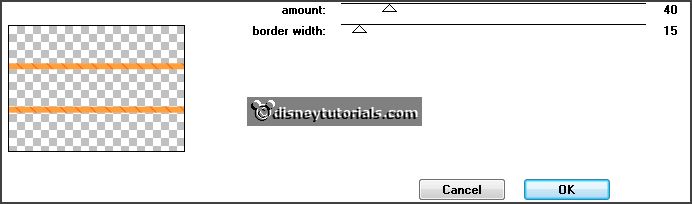
Selections - modify - select selection borders -
with this setting.
5.
Layers - new raster layer.
Set the foreground back to color #f97812.
Fill the selection with the foreground color.
Effects - plug-ins - Penta.com - VRT2 -
with this setting - click OK.
Effects - Edge effects - enhance.
Selections - select none.
Layers - merge - merge down.
Effects - 3D Effects - drop shadow - setting
is right.
6.
Activate selection tool - custom selection
- with this setting.
Layers - new raster layer.
Fill the selection with the foreground color.
Selections - select none.
Layers - arrange - move down.
7.
Layers - duplicate.
Image - flip.
Layers - merge - merge down.
Effects - plug-ins - Penta.com - Jeans
- with this setting - click OK.
Effects - Edge effects - enhance.
8.
Layers - duplicate.
Image - mirror.
Layers - merge - merge down.
Selections - select all.
Selections - float - selection - defloat.
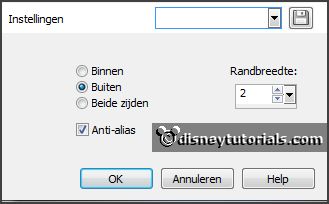
Selections - modify - select selection borders
- with this setting.
9.
Layers - new raster layer.
Set the foreground color back to black.
Fill the selection with the foreground color.
Selections - select none.
Layers - merge - merge down.
10.
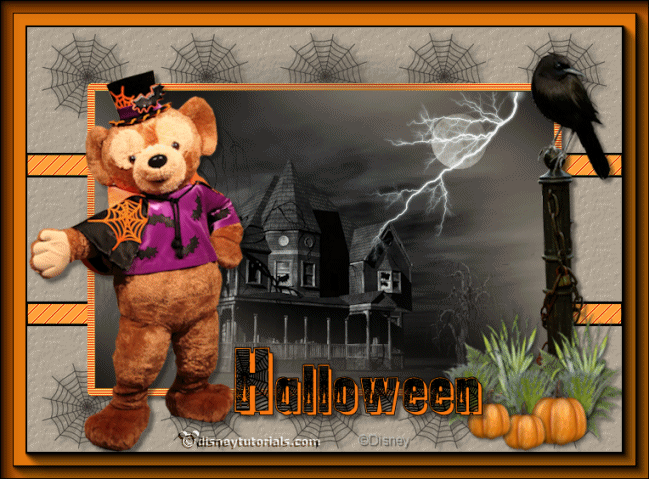
Activate the top layer.
Activate the tube scaryhalloween house - edit
- copy.
Edit - paste as a new layer on the image.
Image - mirror.
11.
Activate the tube duffyhalw2 - edit - copy.
Edit - paste as a new layer on the image.
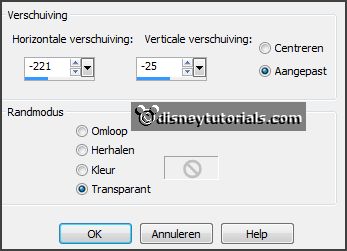
Effects - Image effects - offset - with this
setting.
Effects - 3D Effects - drop shadow - setting
is right.
12.
Activate the tube element8 - edit - copy.
Edit - paste as a new layer on the image.
Image - resize 105% - all not checked.
Activate move tool - place this to the right side - see example.
Effects - 3D Effects - drop shadow - setting
is right.
13.
Activate the tube graspompoen - - edit - copy.
Edit - paste as a new layer on the image.
Place it at the bottom right on the pole with raven.
14.
Set in je material palette the foreground to black and the background to #f79812.
Activate text tool - with setting below.

Write Halloween - convert to raster layer.
Effects - 3D Effects - drop shadow - setting is right.
Place this in the middle at the bottom.
15.
Layers - new raster layer - put your watermark into the image.
Image - add border 2 pixels - foreground color black.
Image - add border 30 pixels - background color orange.
16.
Effects - plug-ins - AAA Frames - Foto
Frame - with this setting - click
OK.
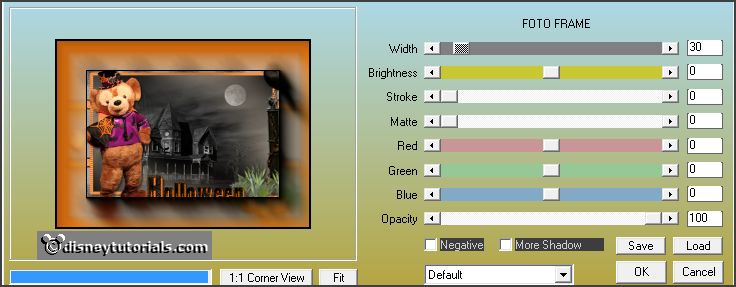
Repeat Foto Frame - now with width op 15 - click OK.
Edit - copy.
17.
Open Animation Shop - paste as a new animation.
Edit - duplicate selected.
Edit - duplicate selected.
Edit - duplicate selected. (In total 5 frames)
18.
Open animation Emmy-bliksem - edit - select all.
Animation - mirror.
Edit - copy.
Edit - paste in selected frames.
Place this right on the frame - see example.
19.
Animation - resize animation - with this
setting.
File - save as - give name - click 3 times at next and than at finish.