|

This
Tutorial is copyrighted to the Tutorial Writer, © Emmy Kruyswijk January
2012.
This Tutorial
may
not be forwarded, shared or otherwise placed on any Web Site or group without written
permission from
Emmy Kruyswijk
Do you want to link my lessons?
Please send
me a mail.
Materials

Needing
Animation Shop
1 Disney tube, made by me, 1
animation,
scrapkit van Fantasy Moments - Sweet Valentine -
download here.
Open your tubes, word-art in PSP
Sweet Valentine

1.
Open new transparent image 700x700.
Open from the scrapkit paper 24 - copy and paste as a new layer on
the image.
Copy element 20 - paste as a new layer on the image..
Place this at the top - 60 pixels from the top.
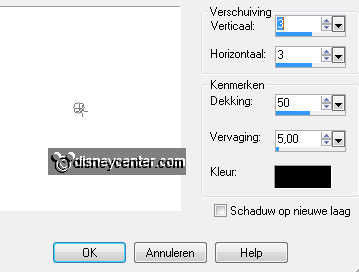
Effects - 3D Effects - drop shadow - with this setting.
Duplicate this layer - image - free rotate left 90.
Place this left - 60 pixels from the left side.
2.
Copy element 62 - paste as a new layer on the image.
Image - resize 80% - all layers not checked.
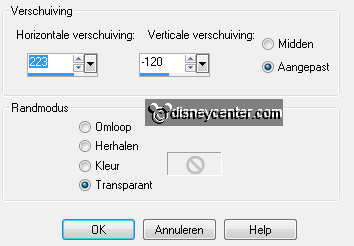
Effects - Image Effects - Offset - with this setting.

Layers - arrange - move down 2 times.
I have made a part of the bow visible.
3.
Click with the magic wand in the middle of the heart.
Selections - expand 4.
Copy paper 8 - paste as a new layer on the image.
Selections - invert - click at the delete key.
Selections - select none.
Layers - arrange - move down.
Give the same drop shadow as in point 1.
4.
Make the top layer active.
Copy element32 - paste as a new layer on the image.
Image - resize 50% - 1 time 85% - all layers not checked.
Effects - Image Effects - Offset - with this setting.
Give the same drop shadow as in point 1.
5.
Copy element 66 - paste as a new layer on the image.
Image - resize 50% - all layers not checked.
Place this above the pot I Love You.
Layers - arrange - move down.
Give the same drop shadow as in point 1.
6.
Make the top layer active.
Copy element 50 - paste as a new layer on the image.
Image - resize 50% - 1 time 75% - all layers not checked.
Place this left of the pot.
Give the same drop shadow as in point 1.
7.
Copy element 73 - copy and paste as a new layer on the image.
Image - resize - 50% - all layers not checked.
Give the same drop shadow as in point 1.
Place this right at the bottom.
8.
Open element 38 - image - rotate left.
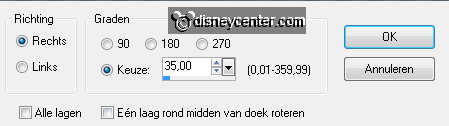
Image - free rotate - with this setting.
Move this a little to the right, so that the flower is visible.
Copy - paste as a new layer on the image.
Image - resize 65% - 1 time 90% - all layers not checked.
Place this at the bottom - see example.
Give the same drop shadow as in point 1.
9.
Layers - arrange - move down.
Duplicate this layer - image - flip.
Image - free rotate - right 25.
Place this above the other. Get a piece of stem.
10.
Make the top layer active.
Copy element 23 - paste as a new layer on the image.
Image - resize 2 times 50% - all layers not checked.
Place this in the left upper corner.
Give the same drop shadow as in point 1.
11.
Duplicate this layer and place this at the top right. See
example.
Duplicate this layer and place this left at the bottom.
Duplicate this layer - Image - resize 50% - all layers not checked.
Place this above the large flower.
Duplicate this layer 3 times.
Place them 1 under the large flower. The 2 others at the top - left
and right of the large flower.
12.
Lock the 3 bottom layers - stay at 1 of the other layers.
Layers - merge - merge all visible.
Make raster 2 active.
Copy microod - paste as a new layer on the image.
Duplicate this layer - Set the original tube layer under raster 2.
Lock the copy layer - make the tube layer active.
Erase the black part under the heart carefully.
13.
Open the copy layer and make this active.
Go to free hand selection tool - point to point - make a
selection as below.
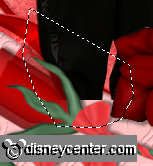
Click at the delete key.
Selections - select none.
Give the original tube layer the same drop shadow as in point 1.
14.
New raster layer - put your name or watermark into the image.
Layers - merge - merge all.
Image - add border - symmetric - 2 pixels - color #9d0f16
Image - resize 85% - all layers checked.
Edit - copy. Open Animation Shop.
15.
In AS - paste as a new animation.
Edit - duplicate selected - edit - select all.
Open animation glitter - edit - select all.
Copy - paste into selected frame.
Place this where you want this. I put them in the middle of every
flower.
All you need to do is every time - paste - in selected frame.
File - save as - give name - click 3 times at next and than at
finish.
Ready is the tag
I hope you like this tutorial.
greetings Emmy
Tested by Cobie

Tutorial written 24-01-2012
|