2
.
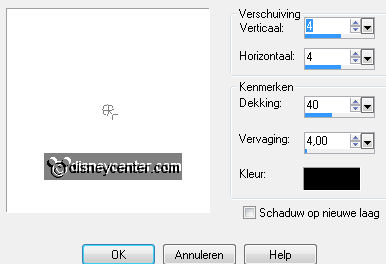
Make from the foreground a gradient
sunburst – with this setting.
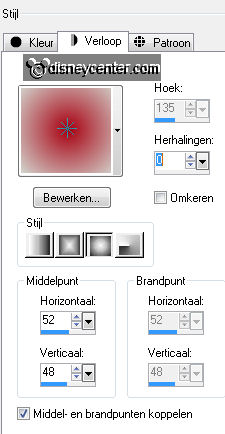
Activate flood fill tool – fill the layer with the
gradient.
3.
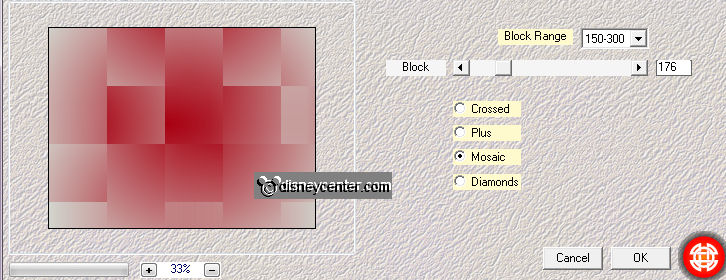
Effects – plug-ins – Mehdi – Sorting Tiles –
with this setting -
click
OK.
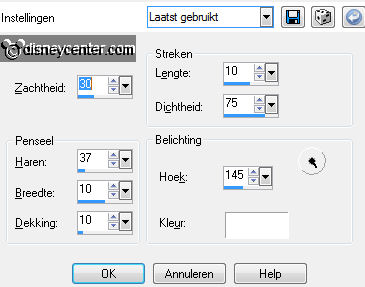
Effects – Art Media – brush strokes - with this
setting.
4.
Layers – duplicate.
Image – resize 85% - all layers not checked.
Effects – plug-ins – Mehdi – Sorting Tiles – with this setting -
click
OK.
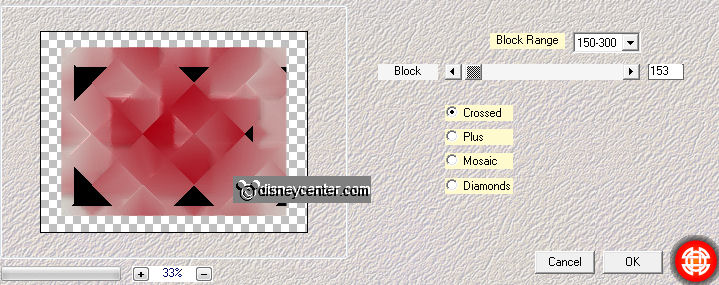
Effects – Edge effects – enhance.
5.
Open from the scrapkit part.1 – Winter Magic by Magi74 ramka (4)
Image – resize 50% and 1 time 50% - all layers checked.
Edit - copy – edit – paste as a new layer on the image.
Activate move tool and move the tube right at the top– see example.
6.
Layers – duplicate.
Image – flip.
Activate the magic wand – with setting below – and select inside the top circle.

Selections – modify – expand 15 pixels.
7.
Activate the image sneeuw – edit - copy.
Edit - paste as a new layer on the image.
Selections – invert – click on the delete key.
Layers – merge – merge down.
8.
Effects – 3D Effects – drop shadow –
with this setting.
Select with the magic wand - setting is right -
inside the bottom circle.
Selections – modify – expand 15 pixels.
9.
Activate the image sneeuw1 – edit - copy.
Edit - paste as a new layer on the image.
Selections – invert – click on the delete key.
Layers – merge – merge down.
Effects – 3D Effects – drop shadow – with this setting.
10.
Open from the scrapkit part.2 – Winter Magic by Magi74 el(17).
Image – resize 2 times 50% - all layers
checked.
Edit - copy – edit – paste as a new layer on the image.
Move the tube at the 2 circles – see example.
11.
Effects – 3D Effects – drop shadow – with this setting.
Open from the
scrapkit part.2 – Winter Magic by Magi74 el(14).
Image – resize 2 times 50% - all layers
checked.
Edit - copy – edit – paste as a new layer on the
image.
Place the tube on the white branch.
Effects – 3D Effects – drop shadow – with this setting.
13.
Open from the scrapkit part.2 – Winter Magic by Magi74 el(47).
Image – resize 2 times 50% - 1 time85% - all layers checked.
Edit - copy – edit – paste as a new layer on the image.
14.
Place the tube near the green branch – see example.
Effects – 3D Effects – drop shadow – with this setting.
15.
Open from the scrapkit part.2 – Winter Magic by Magi74 el(21).
Image – rotate left.
Image – resize 2 times 50% - all layers checked.
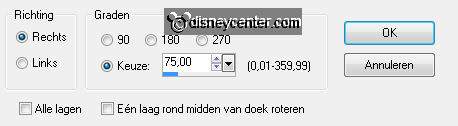
Image – free rotate – with this setting.
Edit - copy – edit – paste as a new layer on the
image.
16.
Place the tube near the top circle – see example.
Layers – arrange – move down - under raster 2.
Activate the top layer.
Effects – 3D Effects – drop shadow – with this setting.
17.
Open from the scrapkit part.2 – Winter Magic by Magi74 el(15).
Image – resize 2 times 50% - all layers checked.
Image – mirror – image – flip.
Edit - copy – edit – paste as a new layer on the image.18.
Place the tube in the middle of the circles – see example.
Layers – arrange – move down - under raster 2.
Effects – 3D Effects – drop shadow – with this setting.
19.
Open from the scrapkit part.2 – Winter Magic by Magi74 el(31).
Image – resize 3 times 50% - all layers checked.
Edit - copy – edit – paste as a new layer on the image.
Place the tube in the middle of the white branch – see example.
Effects – 3D Effects – drop shadow – with this setting.
20.
Open from the scrapkit part.2 – Winter Magic by Magi74 el(54).
Image – resize 2 times 50% and 1 time 75% - all layers checked.
Edit - copy – edit – paste as a new layer on the image.
Place the tube left at the bottom of the circle – see example.
Effects – 3D Effects – drop shadow – with this setting.
21.
Open from the scrapkit part.2 – Winter Magic by Magi74 el(29).
Image – resize 2 times 50% en 1 time 75% - all layers checked.
Edit - copy – edit – paste as a new layer on the image.
Place the tube right at the bottom of the present – see example.
Effects – 3D Effects – drop shadow – with this setting.
22.
Activate copy of raster 1.
Effects – plug-ins – Alien Skin Eye Candy 5 Impact – Gradient Glow.
Click on Settings – User Settings – click on Emmytimeformagic – click OK.
23.
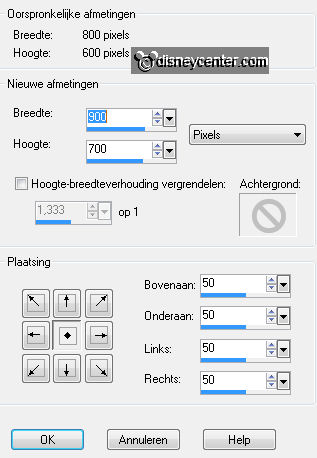
Image – canvas size – with this
setting.
Selections – select all.
Selections – modify – contract 50 pixels.
Selections – invert.
24.
Layers – new raster layer.
Fill the selection with the gradient – now invert checked.
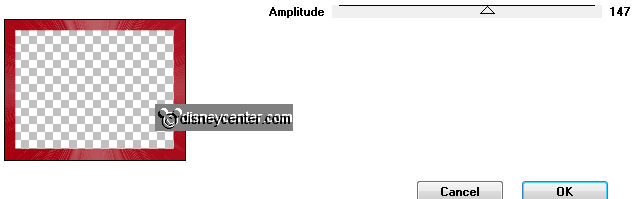
Effects – plug-ins – Funhouse – SpyroZag – with this setting - click OK.
Effects – Edge effects – enhance.
Effects – 3D Effects – Inner Bevel – with this setting.
25.
Activate the tube minniekerst2 – edit - copy.
Edit - paste as a new layer on the image.
Image – mirror.
Place the tube at the left side.
26.
Effects – 3D Effects – drop shadow – with this setting.
Layers – duplicate.
Go to the original tube layer.
Effects – plug-ins – Alien Skin Eye Candy 5 Impact – Gradient Glow.
Click on Settings – User Settings – click on Emmytimeformagic – click OK.
27.
Go to the copy layer of the tube.
Effects – plug-ins – Alien Skin Eye Candy 5 Impact – Gradient Glow.
Click on Basic – Click on Random Seed – Click OK.
28.
Look for a nice font and write Time for Magic – size 60 dependent on the font.
Effects – 3D Effects – drop shadow – with this setting.
Place thee text on a nice place.
29.
Layers – new raster layer – put your watermark into the image.
Image – resize 75% - all layers checked.
Lock in the layer palette the copy layer of the minnietube.
Activate the bottom layer - edit – copy merged.
30.
Open animation shop – edit – paste as a new animation.
Back to PSP –lock the minnietube layer and open the copy of the
minnietube layer.
Edit – copy merged
31.
In AS – edit – paste after active frame.
File
– save as– give name – click 3 times at next and than at finish.
Ready is the tag
I hope you like this tutorial.
greetings Emmy
Tested by Nelly