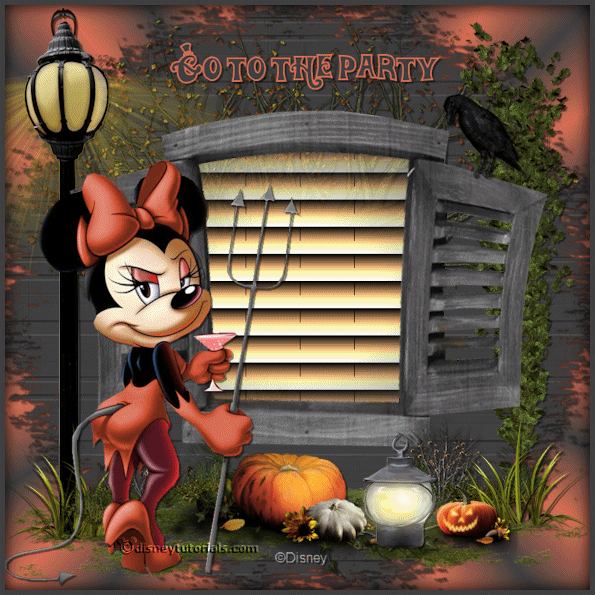
1.
File - open new transparent image 700x700.
Set in the material palette the foreground
color at #404040 and the background color
at
#d86e56.
Make from the background a gradient radial - with this setting.
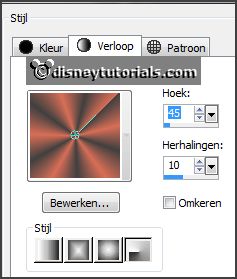
Activate flood fill tool - fill the layer with the gradient.
Layers - new raster layer - fill this with the foreground color.
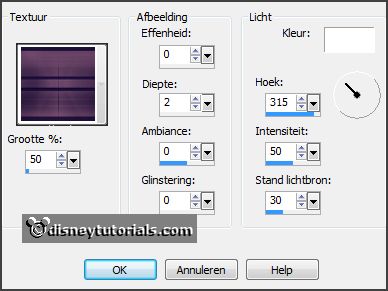
Effects - Texture effects - Texture - patroon.bmp - with this setting.
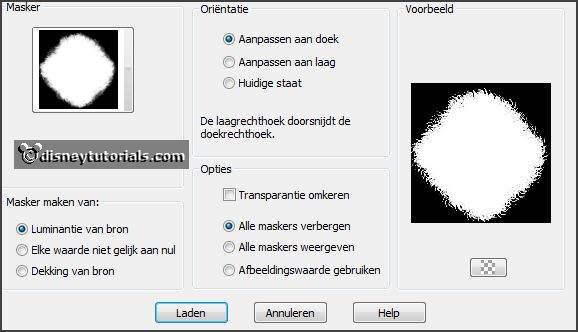
Layers - load/save mask - load mask from disk - look masker 008 - with this
setting.
2.
Activate the tube Magic Old_Tree_Scrap and Tubes - edit - copy.
Edit - paste as a new layer on the image.
Activate move tool - move this to the top.
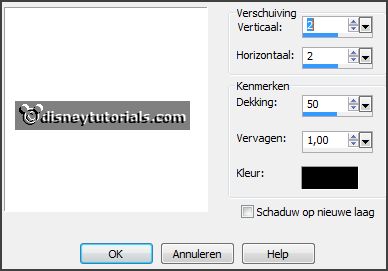
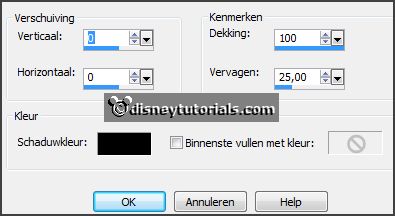
Effects - 3D Effects - drop shadow - with this setting.
3.
Activate the tube BS23--Hierba2 - edit - copy.
Edit - paste as a new layer on the image.
Place this at the bottom.
4.
Activate the tube element27 - edit - copy.
Edit - paste as a new layer on the image.
Image - free rotate - with this setting.
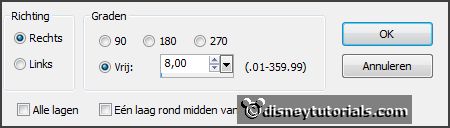
Image - resize 115% - all layers not checked.
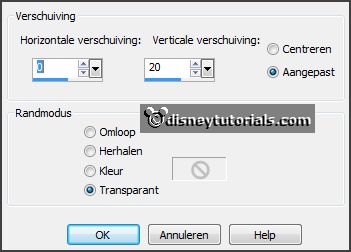
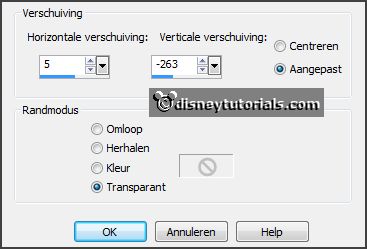
Effects - Image effects - offset - with this setting.
5.
Activate eraser tool - erase the piece tree under the window.
Activate the magic wand - with this setting below - select in the middle of the
window.

Selections - modify - expand 10 pixels.
6.
Activate the tube haunte-house - edit - copy.
Edit - paste as a new layer on the image.
Selections - invert - click at the delete key.
Selections - invert.
Layers - arrange - move down.
Layers - duplicate and 2 more time.
7.
Activate raster 5.
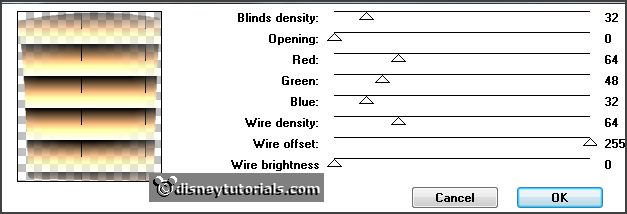
Effects - plug-ins - Unplugged Tools - Jalusi - with this setting - click
OK.
Activate copy of raster 5.
Repeat - Unplugged Tools - Jalusi - change only opening in 10 - click OK.
Activate copy(2) of raster 5.
Repeat - Unplugged Tools - Jalusi - change
only opening in 20 - click OK.
Activate copy(3) of raster 5.
Repeat - Unplugged Tools - Jalusi - change
only opening in 30 - click OK.
Selections - select none.
Lock the 3 copy layers.
8.
Activate the top layer
Activate the tube SussieM Scary Night CF4-
edit - copy.
Edit - paste as a new layer on the image.
Effects - Image effects - offset - with this setting.
Effects - 3D Effects - drop shadow - setting is right.
9.
Activate the tube florju_Afterthesummer_elements(127) -
edit - copy.
Edit - paste as a new layer on the image.
Place this right near the pumpkins - see example.
Effects - 3D Effects - drop shadow - setting
is right.
10.
Activate the tube SussieM Scary Night CF3-
edit - copy.
Edit - paste as a new layer on the image.
Place this right near the lamp.
Effects - 3D Effects - drop shadow - setting
is right.
11.
Activate the tube BS23--Hierba4 - edit - copy.
Edit - paste as a new layer on the image.
Place this near the little pumpkin - see
example.
Layers - arrange - move down.
Effects - 3D Effects - drop shadow - setting
is right.
Layers- duplicate.
Image - mirror.
12.
Activate the tube Carena-In the Forest 098 -
edit - copy.
Edit - paste as a new layer on the image.
Place this to the left side - see example - below the layer copy of raster
9.
Effects - 3D Effects - drop shadow - setting
is right.
Place this under raster 4.
Move this layer (copy of raster 9) slightly down and that the pole behind it.
13.
Activate the tube grassen - edit - copy.
Edit - paste as a new layer on the image.
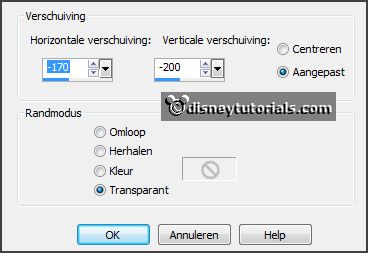
Effects - Image effects - offset - with this setting.
Effects - 3D Effects - drop shadow - setting
is right.
14.
Activate the tube grassen1 - edit - copy.
Edit - paste as a new layer on the image.
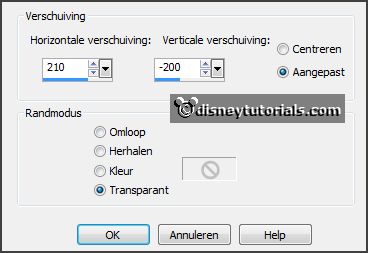
Effects - Image effects - offset - with this setting.
Effects - 3D Effects - drop shadow - setting
is right.
Move this layer under raster 7.
15.
Activate the tube Lacarolita_Scream_at the Night Crow1 -
edit - copy.
Edit - paste as a new layer on the image.
Image - resize 75% - all layers not checked.
Place this on the right panel - see example.
Effects - 3D Effects - drop shadow - setting
is right.
16.
Activate the top layer.
Activate the tube minniehalw2 - edit - copy.
Edit - paste as a new layer on the image.
Place this left- see example.
Effects - 3D Effects - drop shadow - setting
is right.
17.
Turn the colors in the material palette.
Activate text tool - with this setting below - and write - Go to the Party.

Convert to raster layer.
Place this in the middle at the top - see
example.
Effects - 3D Effects - drop shadow - setting
is right.
18.
Activate the tube DVB_TheWitchesDen_element(70) -
edit - copy.
Edit - paste as a new layer on the image.
Place this under raster 4.
Effects - 3D Effects - drop shadow - setting
is right.
19.
Activate raster1.
Effects - plug-ins - I.C.NET Software Unlimited Filters 2.0 - Edges Round
- Round Edge 01 - click Apply.
Image - resize 110% - all layers not checked.
Effects - 3D Effects - drop shadow - setting
is right.
20.
Activate raster 10.
Layers - duplicate.
Activate selection tool - freehand selection - point to point - and make a selection -
as below (on the copy layer).

Layers - duplicate.
21.
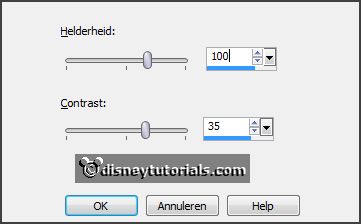
Activate copy of raster 10.
Adjust - brightness and contrast - brightness/contrast - with this setting.
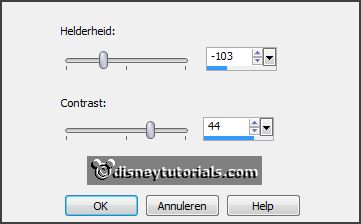
Activate copy(2) of raster 10.
Adjust - brightness and contrast - brightness/contrast - with this setting.
Selections - select none.
Lock this 2 layers.
22.
Layers - new raster layer.
Make from the foreground a gradient radial - with this setting.

Fill the layer with the gradient.
Layers - arrange - move down.
23.
Layers - new raster layer.
Set the foreground back to color.
Fill the layer with the foreground color.
Layers - arrange - bring to top.
Selections - select all.
Selections - modify - contrast 5 pixels - click at the delete key.
Effects - 3D Effects - cutout - with this setting.
Selections - select none.
24.
Layers - new raster layer - put your
watermark into the image.
Image - resize 85% - all layers checked.
25.
Edit - copy merged.
Open Animatie Shop - paste as a new animation.
Back to PSP.
26.
Lock raster 5 and 10 and open copy of raster 5 and copy of raster 10.
Edit - copy merged.
In AS - paste after active frame.
Back to PSP.
27.
Lock copy of raster 5 and 10 and open copy(2) of raster 5 and copy of
raster 10.
Edit - copy merged.
In AS - paste after active frame - be
sure the last frame is selected.
Back to PSP.
28.
Lock copy(2) of raster 5 and raster 10 and open copy(3) of raster 5 and copy(2)
of raster 10.
Edit - copy merged.
In AS - paste after active frame.
29.
Animations - Frame Properties - set the first frame to 100 - set the
frames 2 and 3 to 25 - and the last frame to 200.
File - save as - give name - click 3 times at
next and than at finish.