Open new image 700x600.
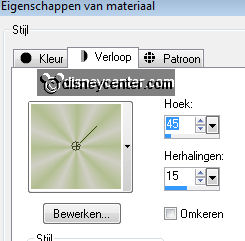
Fill this with gradient radial - with this setting.
Adjust - Blur - Gaussian blur - Radius 30.
2.
Copy Misted006 and paste as a new layer.
Adjust - Blur - Gaussian blur - Radius 30.
Effects - Distortion Effects - Pixelate - with this setting.
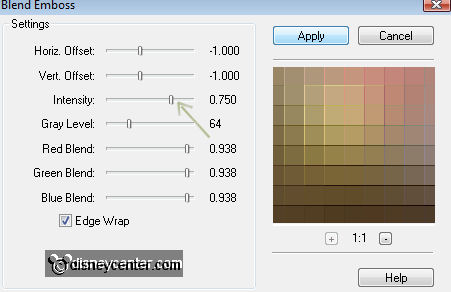
Effects - FM Tile Tools - Blend Emboss - with this setting.
3.
Copy again Misted006 and paste as a new layer.
Image - Resize 75% - resize all layers not checked.
Put the opacity of this layer at 50.
4.
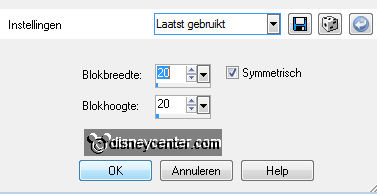
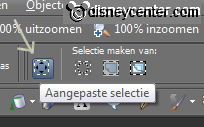
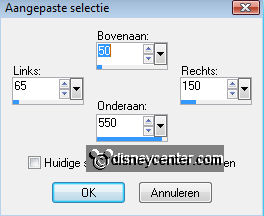
Go to selection tool - selection - Custom selection - with this setting.
New raster layer - fill this with gold pattern.
Selections - modify - contract 3.
New raster layer - fill this with the foreground color.
5.
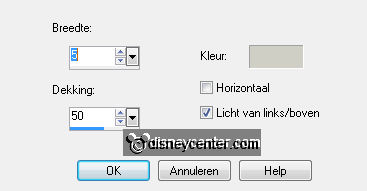
Effects - Texture effects - Blinds - with this setting.
Selections - modify - contract 15
New raster layer - fill this with gold pattern.
Selections - modify - contract 3.
New raster layer - fill this with the foreground color.
Effects - 3D Effects - Buttonize - with this setting.
6.
Layers - merge - merge down.
Layers - merge - merge down.
Layers - merge - merge down.
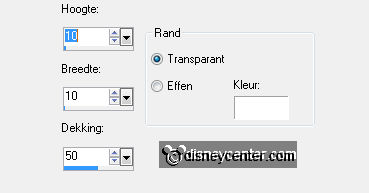
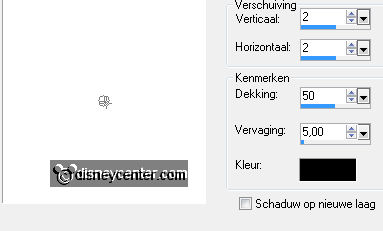
Effects - 3D Effects - drop shadow with this setting.
7.
Duplicate this layer - Image - Mirror.
Go to text tool - font Marquee - size 60 - foreground gold pattern - background #b2be90.
Write - Happy - enter - Write - Easter - convert to raster layer.
Give the same drop shadow as in point 6.
8.
Copy line and paste as a new layer.
Give the same drop shadow as in point 6.
Duplicate this layer 3 times.
Place them under each other.
9.
Layers - merge - merge down.
Layers - merge - merge down.
Layers - merge - merge down.
10.
Duplicate this layer - Image - mirror.
Copy DBV Easter 2010 element and paste as a new layer.
Give the same drop shadow as in point 6.
Place this at the left rectangle.
Duplicate this layer - Image - mirror.
11.
Copy ial_fb_chicken and paste as a new layer.
Give the same drop shadow as in point 6.
Place this right at the bottom.
Duplicate this layer - Image - Resize 75% - resize all layers not checked.
12.
Image - add border 3 - take a color that's not in the image.
Select the border - fill with gold pattern.
Selections - select none.
Image - Resize 75% - resize all layers not checked.
13.
Image - add border 25 - foreground color.
Select the border - fill this with gradient of point 1.
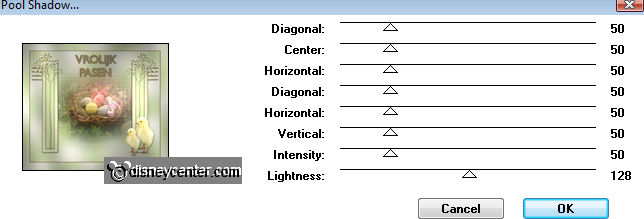
Effects - Tramage - Pool Shadow - with this setting.
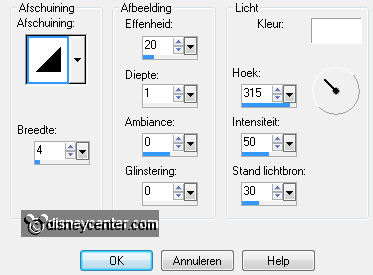
Effects - 3D Effects - Inner Bevel - with this setting.
Selections - select none.
14.
Image - add border 3 - take a color that's not in the image.
Select the border - fill with gold pattern.
Selections - select none.
15.
New raster layer - put your watermark into the image.
Copy Disney Easter70 - and paste as a new layer.
Effects - Xero - Porcelain - with this setting.

Give the same drop shadow as in point 6.
Place this left at the bottom. see example.
16.
Image - Resize 85% - resize all layers checked.
Layers - merge - merge all.
File - export - jpeg. optimizer.
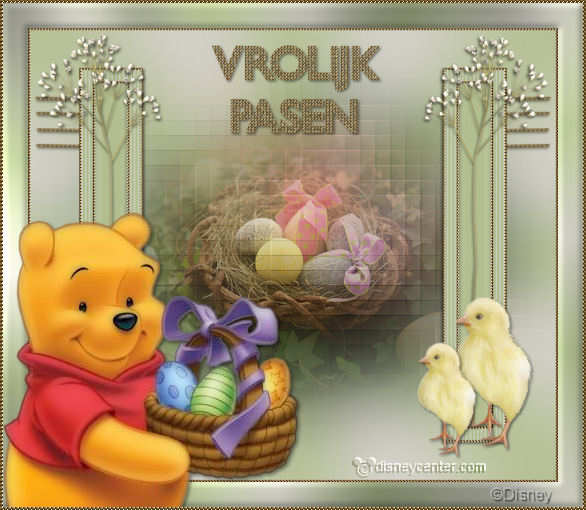
Ready is the tag
I hope you like this tutorial.
greetings Emmy,