Foreground color #8095b4 and background color #e7d9c8.
1.
Open new transparent image 650x500.
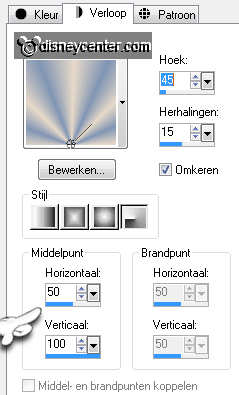
Fill this with the gradient radial - with this setting.
Adjust - Blur - Gaussian blur at 20.
2.
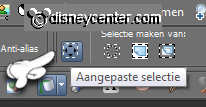
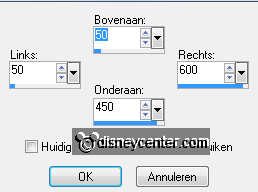
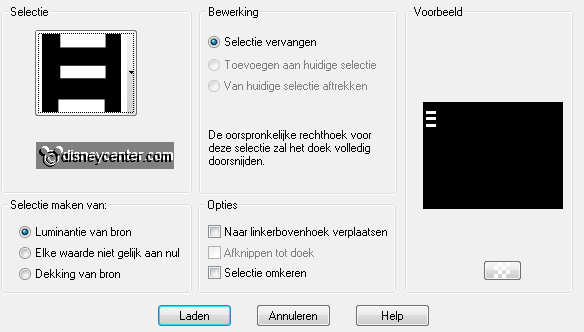
Go to selection tool - custom selection.
with this setting.
New raster layer - fill this with the foreground color.
3.
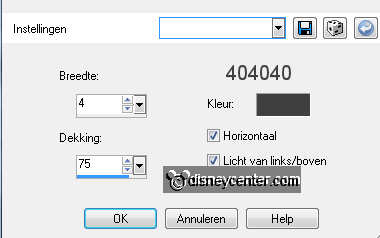
Selections - modify - select selection borders - with this
setting.
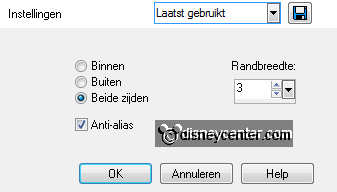
New raster layer - Fill this with the background color.
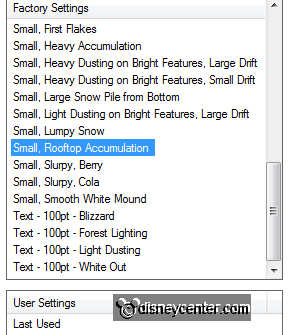
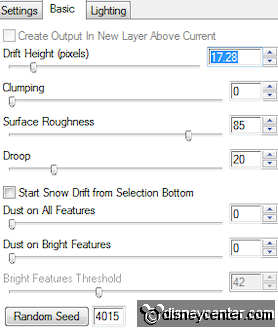
Effects - Alien Skin Eye Candy Nature - Snowdrift - by settings and
basic - see below.
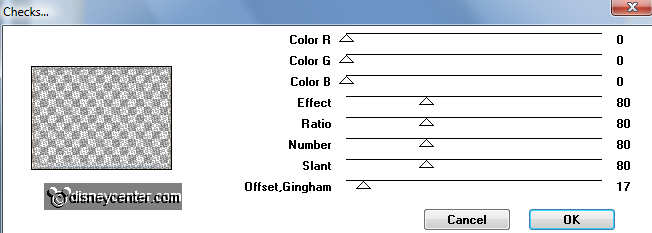
Effects - MuRa's Meister Seamless - Checks - with this setting.
4.
Selections - select none.
Layers - merge - merge down.
Effects - 3D Effects - drop shadow - with this setting.
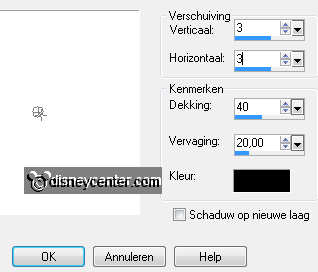
Repeat the drop shadow, but now with -3.
5.
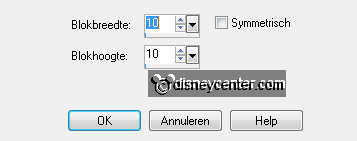
Go to the magic wand - with this setting.

Select the blue square - new raster layer.
Copy sneeuw2 and paste into selection.
Put the opacity of this layer at 75 and the Blend Mode at luminance
(Legacy).
Selections - select none.
6.
Stay at the bottom layer.
Effects - Distortion Effects - Pixelate - with this setting.
Effects - Edge Effects - enhance. Repeat this twice.
7.
Image - add border - 2 pixels - foreground color.
Duplicate this layer - image - resize 90% - all layers not checked.
Give the same drop shadow as in point 4. Repeat with -3.
8.
New raster layer.
Selections - Load/Save Selection - Load selection from disk -
look emmykerst4 - with this setting.
Fill this with the foreground color.
Effects - texture effects - Blinds - with this setting.
9.
Selections - select none.
Give the same drop shadow as in point 4. NO Repeat.
Effects - Simple - Top left Mirror - click OK.
10.
Copy mmwit and paste as a new layer on the image.
Image - resize 75% - all layers not checked.
Duplicate this layer.
11.
Adjust - Blur - Gaussian blur at 20.
Layers - Arrange - move down.
Layers - merge - merge down.
12.
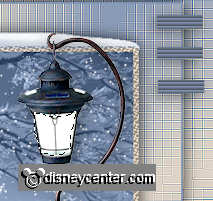
Copy cajoline_lantern11 and paste as a new layer on the image.
Image - resize 50% and 1 time 90% - all layers not checked.
Place this right at the bottom. see example.
Give the same drop shadow as in point 9.
13.
Make copy of Background active.
Go to selection tool - rectangle - and make a selection round the
landscape.
Duplicate this layer - Lock copy(2).
14.
Stay at the copy layer.
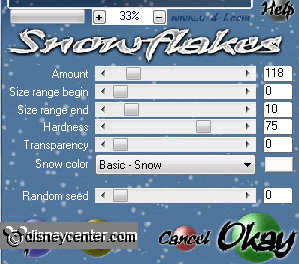
Effects - VDL-Adrenaline - Snowflakes - with this setting.
Lock this layer and open copy(2).
Repeat VDL-Adrenaline - now with random seed at 1000.
Selections - select none.
15.
Make the top layer active.
Go to Free Hand selection tool - free hand - and make a selection as
below.
Duplicate this layer - and lock the copy layer.
Make the layer below active.
16.
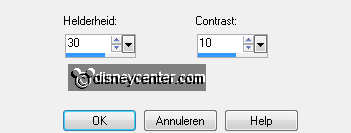
Adjust - Brightness and Contrast - brightness/contrast - with
this setting.
Lock this layer and open copy layer.
Repeat the brightness, now with brightness at 50. Contrast stays the
same.
Selections - select none.
17.
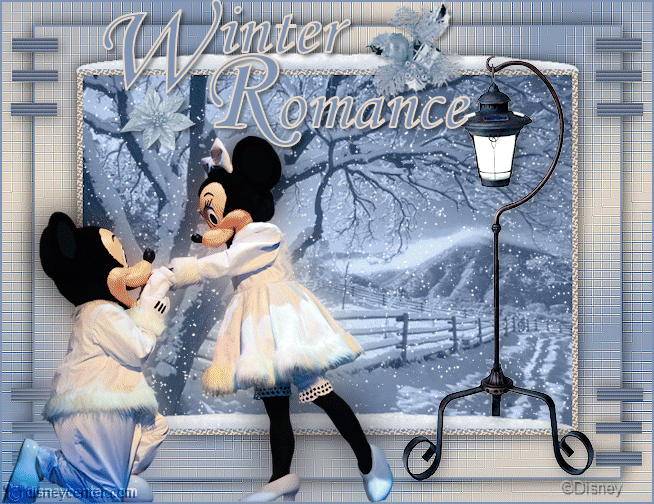
New raster layer - put your watermark into the image.
Copy word-art-WinterRomance and paste as a new layer on the image.
Place this at the top in the middle.
Lock the copy of raster 2 (lantern) and copy(2) of Background.
Make the bottom layer active.
18.
Edit - copy merged.
Open animation shop - paste as a new animation.
Back in PSP - Lock the layers copy of Background and raster 2 and open
copy(2) of Background and copy of raster2.
19.
Edit - copy merged.
In AS - paste after active frame.
File - save as - give name - click 3 times at next and than at
finish.