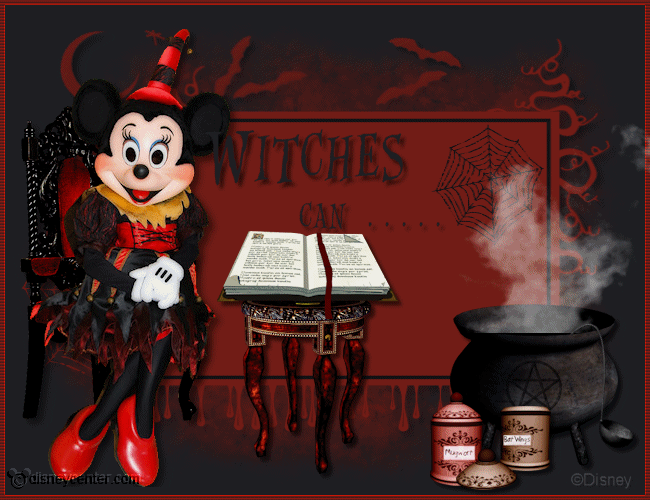
Witch
Foreground color #1e1f23 and background color #711c16.
1.
Open new transparent image 650x500.
Fill this with the foreground color
New raster layer - fill this with the background color.
2.
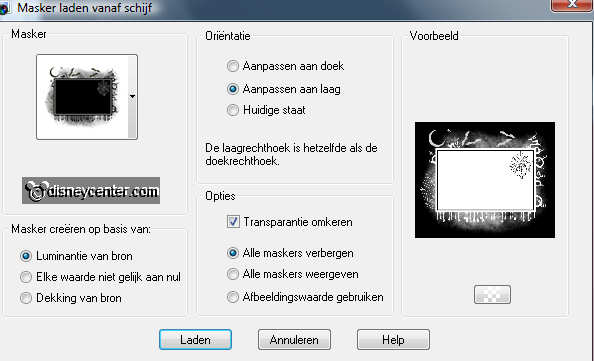
Layers - Load/Save mask - load mask from disk.
Look for masker Vaybs mask hw 02 - with this setting.
Layers - merge - merge group.
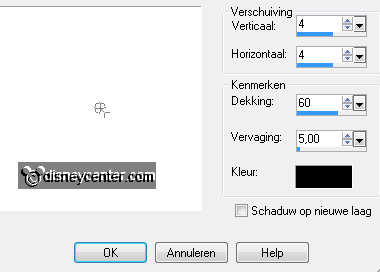
Effects - 3D Effects - drop shadow - with this setting.
3.
Open DBV TheWitchesDen element14 - image - resize 50% - all layers checked.
Copy element14 and paste as a new layer.
Give the same drop shadow as in point 2.
Place this at the left side.
4.
Copy mhalw1 and paste as a new layer.
image - resize 75% - all layers not checked.
Give the same drop shadow as in point 2.
Place this at the chair - with the arm on the armrest.
5.
Open DBV TheWitchesDen element2 - image - resize 50% - all layers checked.
Copy element2 and paste as a new layer.
Give the same drop shadow as in point 2.
Place this near Minnie.
6.
Open DBV TheWitchesDen element3 - image - resize 50% - all layers checked.
Copy element3 and paste as a new layer.
Give the same drop shadow as in point 2.
Place this on the table.
7.
Open DBV TheWitchesDen element63 - image - resize 50% - all layers checked.
Copy element63 and paste as a new layer.
Give the same drop shadow as in point 2.
Place this right at the bottom.
8.
Open DBV TheWitchesDen element65 - image - resize 50% - image - resize 75% -
all layers checked..
Copy element65 and paste as a new layer.
Give the same drop shadow as in point 2.
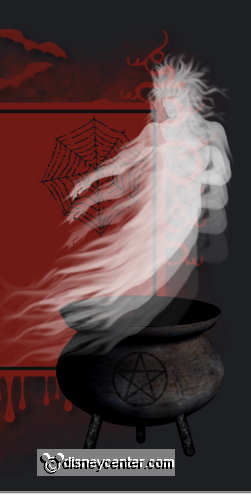
Place it for the cauldron.
9.
Open DBV TheWitchesDen element64 - image - resize 50% - image - resize 75% -
all layers checked..
Copy element64 and paste as a new layer.
Give the same drop shadow as in point 2.
Place it for the cauldron.
Layers - merge - merge down.
10.
Open DBV TheWitchesDen element35 - image - resize 50% - all layers checked.
Copy element35 and paste as a new layer.
Give the same drop shadow as in point 2.
Place it on the cauldron. - see below.
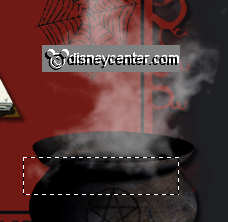
Go to selection tool - selection - rectangle - make a rectangle on the cauldron.
Click at the delete key of your keyboard.
Selections - select none.
11.
Lock this layer for now.
Open DBV TheWitchesDen element7 - image - resize 50% - all layers checked.
Copy element7 and paste as a new layer.
Place it on the cauldron.

Duplicate this layer 3 times.
move them slightly above, see below
12.
Lock the copy layers.
Go to selection tool - selection - rectangle - make a rectangle on the cauldron.
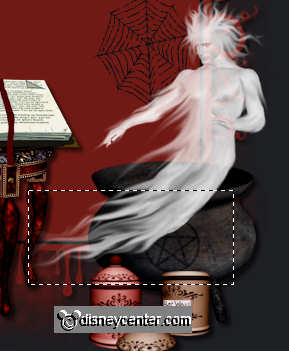
Click at the delete key of your keyboard.
Selections - select none.
Now do the same with the copy layer, which only outside the cauldron. You can
also use the eraser.
Set the opacity of these 4 layers at 10 (by me) raster 9, 30 copy raster
9, 50 copy (1) raster 9 and 70 copy (2) raster 9.
13.
Open DBV TheWitchesDen element66 - image - resize 50% - image - resize 75% -
all layers checked..
Copy element66 and paste as a new layer.
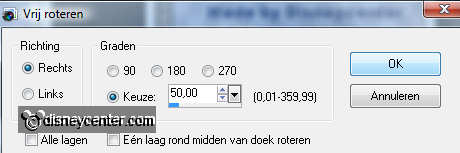
Image - mirror - image - free rotate 50 right.
Give the same drop shadow as in point 2.
Place this at the right side of the cauldron. see example.
14.
Copt wordart and paste as a new layer.
Place this above the book. see example.
Lock raster 9 also. (Now the four layers with ghosts are locked)
And open raster 8 (the steam layer)
15.
Selections - select all.
Selections - modify - contract 5 - selections - invert - fill this with the
background color.
Effects - texture effects - blinds - with this setting.
Effects - Edge Effects - enhance.
Selections - select none.
New raster layer - put your watermark into the image.
16.
Edit - copy merge.
Open animation shop - paste as a new animation.
Back in PSP - (by me) - lock raster 8 (steam layer) and open raster 9 (ghost
layer).
Edit - copy merge.
Back in AS - paste after active frame.
17.
Back in PSP - Lock raster 9 and open copy of raster 9.
Edit - copy merge.
Back in AS - paste after active frame. Make sure the last frame is always
selected.
Back in PSP - Lock copy raster 9 and open copy(1) of raster 9.
Edit - copy merge.
Back in AS - paste after active frame. Make sure the last frame is always
selected.
Back in PSP - Lock copy (1) raster 9 and open copy(2) of raster 9.
Edit - copy merge.
Back in AS - paste after active frame. Make sure the last frame is always
selected.
18.
In animation shop.
Copy frame 1 and select the last frame - paste after active frame.
Animation - Frame properties - Set frame 1, 5 and 6 at 100, frame 2,3 and
4 at 30.
File - save as - give name - click 3 times at next - and then finish.
Ready is the tag
I hope you like this tutorial.
greetings Emmy
Tested by Bep

Tutorial written
12-09-2011

